Tuesday, October 16, 2012

Redoing Dining Chairs for Miraim

Last year at this time I had been regaling you guys with tales of my niece's dining room.
You can check out that story here. here. and here
Miriam and I had found 8 chairs for her dining room.
EIGHT!!!!!
ARMCHAIRS!!!!!
And I may have told her last year.....
that I would glue, paint, reupholster and sew pillows for 
ALL
of them.....

Welllllll.......
So far I've done 4 of them.
This is not my fault....
no, no, no.....
Miriam is supposed to bring the undone four and exchange them with the ones I've 
brilliantly 
finished.
Here is a shot of one of the finished chairs....

But while I wait for her to bring the other 4!!!!!
I will now show off what I've already done!!!!!
We started with this.....
Don't they look nice????
Well they weren't!!!!
They were in horrible condition.
They were some of the most uncomfortable  chairs 
in the universe!!!!!
They had probably come from some school or business, because the way they were glued together in repairs was something baaaadddddd.
They had rounded plugs to cover the holes for the screws, which is a really tacky detail, according to Betsy.....
They're easier to install, because you don't have to worry about the face of the plug lining up with the chair frame.

So, I popped them out, and replaced them with flat ones that I sanded down....

Now they're ready for the paint!!!!
Milk paint to the rescue!!!!!
I used Miss Mustard Seeds new line of milk paint in Lucketts Green.
They took two coats, and then I added some details.
The one on the right had some cream chalk paint detailing.
I painted the edge of the top bar, the circle and the grooved lines.
On the back I added a circle outline by dipping a bottle cap in the paint.....
On the back of the top rail I wanted to paint numbers.
I couldn't find any stencils that I liked, so I used the Graphic Fairy's numbers that I printed out and traced.
But I still needed a No. and I couldn't find one, so I made one up, drew it out.....
So, then I tried to make my own stencil......
Well, that was a big fat failure.....

 So I went and got me some of that white school house chalk and scrubbed the back of the drawing and traced it onto the chair.
Then I had to go and get me one of those there #2 liner brushes that I've been reading about.
BOY!!!!
The right tool really makes a difference.
So I hand painted the #$% numbers on the back of the chairs.
What a pain the the @$$!!!!!
And there are 8 of them.....
NOW AT THIS POINT
I LEARNED ABOUT A STENCIL COMPANY 
THAT HAD JUST WHAT I NEEDED!!!!!!!
It's called Maison de Stencils!!!!!
Well.....
Needless to say I have now bought a lot of stencils from them.
Warning!!!!!
They are not cheap, but I like to spend my money on this kind of stuff.
Who needs diamonds when you can buy stencils???
So for the next four chairs, still to be done.....
I am going to paint them in cream chalk paint with Lucketts Green for the detailing, and use my new stencils.
I like it when all the chairs don't match.
YES I DO!!!!!
THIS IS NOT AN EXCUSE!!!!!
Anyway, 
back to the chairs.....
I was interested to see how the milk paint would chip on the chairs.
When I used it on my dining table it didn't chip at all, so I had to help it along.
One these chairs it chipped too much, so I bought some bonding agent from Miss Mustard Seed and touched up the places that I felt were too distressed.
The picture above is what it looked like when it first started chipping.
It just went a little too far.....
The pictures below is how I got it to look when I was done. 

Then I stripped the old fabric and padding off the old seats and added new 2" medium density foam, covered that in dacron and then put the new fabric on.
We used the fabric that matches the walls and draperies.
So here it is all painted with it's new seat.....
I like the way the milk paint looks....
Just a nice cottagey beat up look.....
But these chairs were still not very comfortable.
The backs just were not well designed for the human body.
So Miriam and I went back out to Calico Corners to look for fabric for the back pillows.
We didn't bring a chair with us, 'cuz that would have been too smart......
I thought that I could do it without a chair.
I am an idiot.
So we brought back several samples to try out.
I was looking for something in a green ticking stripe or check.
I WAS WRONG!!!!!
When we got back to my house and saw the fabrics on the chair, I realized what I really needed was a blue to match the background color of the main fabric.
Calico Corners was closing at 5:00.
It was now 4:00.
Calico Corners was a good 35 minutes away!!!!!!
Sooooooo.......
Miriam and I went flying back out there.
Then it was like being on Project Runway at Mood.
We were given 20 minutes to find a blue that would work and buy it......
(Actually, the ladies who worked there were very sweet, and stayed open an extra 15 minutes for us, 'cuz we was freekin' out!!!!!
Well, we found the perfect fabric!!!!!
So, here's a picture of the chair with the new blue pillow on the back!!!!!
The fabric is this really pretty quilted looking stuff!!!!
I sewed the pillow with a flange ruffle,
and then,
stick a fork in me.....
I was done!!!!!
So the chairs went from this                                     to this
I love them, they look like old garden chairs to me.
Now I just have to do 4 more.....
OY!!!!

Latah, Gatah
Photobucket
Partying at:
My Uncommon Slice of SuburbiaPrimitive and ProperPhotobucketOrganize and Decorate EverythingA Diamond in the StuffNo Minimalist HereDIY TutorialA Delightsome LifeBRAMBLEBERRY COTTAGEshabby creek cottageSABlink-partyPhotobucketvif187<b>Add my button to your sidebar!</b>French Country CottageMiss Mustard Seed's Creative BlogSaturday Nite Special link party via Funky Junk InteriorsIt's Overflowingsunday_button_featDIY project Parade linky party button

Becolorful button with greenBoogieboard Cottagei should be mopping the floorPhotobucketUndertheTableandDreaming

Saturday, October 13, 2012

The Last Waltz

Oh Kay campers.....
Let's finish up this story about the Junior League Showhouse I did in 1997.
We've gone over the floor plan.....
We've gone over the fabrics.....
We've gone over the dance floor.....
And the musician's dais.....
The upholstered servers.....
Doesn't it seem like I'm milking the story?????
Actually, I don't like writing long posts.
Some of my readers...,
(you know who you are),
 have short attention spans.

Today I'm going to start with all the toss pillows.
I really like to needle point.
I listen to books on tape while I do it.
I can waste a #$% load of time doing this..
It's a really wonderful past time when one has no life!!!!!
I designed and needle pointed all the pillows I am about to show you.
ISN'T THIS EXCITING????
I tried to make every saying relate to the party atmosphere.
I even did a pillow that said "Waltz", but I don't got no shot of it.....
I sold every pillow I made in this room!!!!!
I am da bomb!!!!!
I showed you the pillows on the musician'a chairs, but here I am showing then again.
'Cuz I'm talkin' about pillows here!!!!

I also wanted to show this round pillow.
It's an example of the graphic impact a stripe can achieve if cut and sewn on the diagonal,.
You can make either a square, or as in this case, a cross.

 I wanted the room to have a feel as if a real family lived here.
After all, doesn't every normal family have a ball room?????
So I added some personal touches to the mirror over the mantel by sticking some cards and invitations into the frame
 And as a last detail.....
I laid an Aubusson rug over the sisal carpet to help delineate the seating area and add a little color and pattern, 'cuz after all, 
I'm all about the color and pattern!!!!! 

So that brings to a conclusion the story about the ballroom.....

Oh, Wait!!!!!
I'm not done!!!!!
Couple of folks asked about how long this whole process took.
Well, from start to finish, it took several months.
Show house rooms go faster than normal jobs because we're working under really tight time constraints.
But we still have to deal with the time it takes factories and work rooms to create the items we dream up.
The overall conception and design process has to happen really quickly, usually within a couple of weeks, because we are so tight on time.
I start with measuring the room and doing floor plans and elevation drawings.
I draw an elevation of each wall, so that when it's time to install the room, I know exactly where each print, picture and plate is going to be hung.
By doing elevations, it's also really helpful in designing the draperies and any other window treatments I decide to use.
Sometimes I'll do a perspective of the room also, it helps with things like lamp selection, etc.
This way when it comes time to install the design; that process goes fairly quickly because I've worked out pretty much every detail in advance.

Oh Kay!!!
Now I'm done!!!!

Latah, Gatah
Photobucket

Thursday, October 11, 2012

More of This @#$ Ballroom!!!!!

I love it when people 
(you know who you are.....) 
ask me questions about what I'm showing you 
and it neatly dovetails into what I was planning to write about in the next post.
Lots of you (2) asked about the servers against the wall.....
If you notice the pipe running from the floor to the ceiling.....
you may have an inkling of what I was covering up.....
There were honking big ugly radiators.
IN THE
 MIDDLE
 OF MY SHOWHOUSE ROOM!!!

I drew up the design for these babies, and had my workroom, Drape It, make them for me out of plywood.
Then I had them upholstered in more of the cabbage rose linen.
I found the legs in a catelogue that we screwed into the bottom of the boxes.
We used cream colored fabric cording for the criss-cross effect, and glued  fabric covered buttons over the points of the diamonds.
I had glass cut to fit for the tops, and this way created serving areas in the ballroom.
These cabinets had no back, so we were able to just slide them over the radiators.
I am very clever!!!!!! 
The server above was used for the dessert station.
There was LOTS of chocolate.....
I didn't have nothin'!!!
The other server was used for BOOZE!!!!!
Chocolate and Booze.......
PARTAY!!!!

Sooooooo......
The radiators were just one of the awkward elements to the space.
The two bay windows were lovely, but how the @#$ was I going to decorate them to make them make sense in a BALLROOM?????

Soooooooo.......
In the dancing area, I placed a chaise, so someone who was tired from all that there dancing, could have a pretty place to put up her tootsies.
I'm sorry the picture is so blurry, but I had to blow it up from a scanned image.....
In 1997 we didn't have digital stuff, ya know?????

In the other bay window area, I fell back on the tried and true trick of lazy decorators.....
I stuck a topiary in the window!!!!!
A really big sucker!!!!
I still have some of this ivy hanging around. 
Fake ivy is a really useful thingy!!!!!
I put some on my outside trellis, and have received nothing but grief from my family and friends.
Look you guys.....
NOTHING WAS GROWING THERE!!!
I wanted at least something green.

So that's it for today.
It's so much fun to look back on my old designs and realize that I still like them.

Latah, Gatah
Photobucket

Tuesday, October 9, 2012

11th Answer part of OY VEY Q&A Tuesday

Well everybody, my thumb still hurts.
I had my family over for dinner last night, and there were 4 doctors sitting around the table discussing my cut thumb.
Of course,
no one did anything,
 because my father (the oldest doctor at the table), told them to leave it alone.....
My youngest brother,
 (the one who operated on me),
 wanted my oldest brother
 (the one who usually tends to bleeding emergencies in the Speert  households)
to change my outer bandage, (aka: band-aid.).
By now the band-aid is covered in blue and green and white chalk paint.
My brother told me not to get my thumb wet, but he didn't say anything about keeping it unpainted.....,
But my Dad
(the oldest doctor at the table.....)
insisted that I just put another band-aid over the existing one, since the bleeding had stopped, and we didn't want no more of that there blood coming out to possibly stain any white slipcovers.......
Betsy Speert's medical fact #1...
If you put a clean band-aid over a dirty one, it looks like your finger is clean!!!!!
My sister, Nancy
 (another doctor)
 wisely stayed out of the conversation....
 but as she was sitting next to me, I graciously and generously
made
let her look at my band-aid.
Yeah.... OK.....you can maybe tell from this story.....
I'm the youngest of my siblings.....
~~~~~~~~~~~~~~~~~~~~~~~~~~~~~~~

Now!!!!
ON TO THE QUESTIONS!!!!

The first one is from Debi Jaynes


Tried to to the above link--wow too early in the AM for that. Love your tropial bedroom ideas in Trad Home and as I live in the Tropics, would love to do the bead-board on the headboard wall in our bedroom. What is the best height? I was thinking to go just past the top finials of the headboard which still leaves a good bit of wall. Finials are a bit over 5 ft--it's one of those really nice iron beds in a verdi finish. Rest is green walls, mahogany floors and an antique persian rug. Thanks!
~~~~~~~~~~~~~~~~~~~~~~~~~~~~~~ 

She's referring to my guestroom in Florida.

My advice is to go up more than just to above the headboard.
It's just as important to consider the proportion of bead-board to the height of the ceiling, as it is in considering the height of the bed.
I don't know what your ceiling height is, but if it's 8 feet, and the bed is 5 feet, I would probably do the bead-board up to the ceiling.
If your ceilings are high, as many are in Florida, then I might do the bead-board up to around 6 feet.
If I were in Florida, I would measure my wall for you.
But I'm not.
I'm in Massachusetts, serving dinner to my family with a dirty band-aid.
~~~~~~~~~~~~~~~~~~~~~~~~~~~~~~~~

Next.....

RKay asks.....

I think I was the one who pushed your number up to a more desirable one :) I found your blog and spent the entire day here content, enjoying your beautiful homes, design tips and witty sense of humor. Does this get me brownie points for getting my question answered? I did come up with one naturally during my day here, so here goes: I just love design, so I appreciate many design styles. The problem is, I'm saying I love it to everything! How does one pinpont their own style and stay true to it without getting sidetracked? I guess this is a general question without a picture, but I could include something if you would like. Thanks! ps, love the Sanderson room, gorgeous! 
~~~~~~~~~~~~~~~~~~~~~~~~~~~~~~~~~~

This is a hard question.....
It's easy to get distracted, side-tracked, and confused when trying to figure out your style.
I think the most important question is: what feels the most like home to you?
What's going to make the tension leave your body, when you come home at the end of the day, walk through your front door, and really make you feel HOME.
Just because you think a style is pretty, doesn't mean it's going to make you happy to live in it.
Once you've chosen what makes you feel the best...

STICK TO IT!!!!!

I used to repeatedly bark at my clients.

PICK A STYLE!!!!

ANY STYLE!!!

(isn't it cute, how I let them think they were in control?????)

The main point, is once you have the major pieces, and have a direction, 
Don't go off into some other style!!!!!
Hope that helped.
It's hard to do it.
Unless someone pays me a gazillion dollars, and then I am able to figure it out.
'Cuz I'm the
goddess of decorating.
~~~~~~~~~~~~~~~~~~~~~~~~~~~~~

Next....
Virginia Allyn asks.....

Betsy, I'm ponderously decorating my apartment and have made several hideous errors along the way. I would be interested to hear the story of the worst decorating mistake you ever made. (Misery loves company and all that...) 
~~~~~~~~~~~~~~~~~~~~~~~~~~~~~~

Silly, silly girl.....

I've never made a mistake....

Decorating or otherwise, 

in my life!!!!!!!

OR!!!!!

THERE ARE NO MISTAKES!!!!

ONLY LEARNING EXPERIENCES!!!!

The truth of the matter is.....
I've blocked them all from my memory.
That is one of the great benefits of aging!!!!!!!
Photobucket

Sunday, October 7, 2012

Ballroom Dancing...and Eating....and Drinking!!!

Continuing right along.....with the ballroom stories.....and how I lived to tell the tale after decorating such a
BIG
room.....!!!!!
As I said, 
I arranged the room into dancing, eating, chatting and drinking areas.
This is part of the chatting area,
You could also eat and drink here!!!!!
The coffee table is higher than normal.
This is actually called a tea table when it's this height.
So to confuse things.....
I put a coffee service on it!!!!
 I borrowed all the china and silverware from Schreves Crump and Lowe.
For those of you who don't live in the Boston area, that's our version of Tiffany's.
I had to actually buy the napkins.
Sheesh.....
But I still have them and use them on lots of photo shoots.
I piled the dessert stand with little cakes, and hoped the photographer would wait until after the shoot before he ate them.
His name is Eric Roth, and we've been working on shoots together for around 30 years.
He always wants to eat the props!!!!!
I controlled him by promising that he could take home the Chinese food after the shoot.
I bought food that I thought would photograph nicely....
The split second the last shot of the food was done,
 Eric had an egg roll in his mouth.....

The sterling silver chopsticks are a nice touch!!!
Now don't get too excited,
but I actually used.....
(wait for it.....)
Real Flowers!!!!!
This was all set up in the dining area of the ballroom.....
I placed a table behind the central sofa, and arranged chairs facing out towards the dance floor.
I'm going to have to end this post here.....
I cut my thumb yesterday while I was slicing an apple.
I cut it really deeply.
I would have had to go to the emergency room for stitches, 
but my brother 
(the doctor
was visiting my parents next door. 
So I went over there and showed him what I had done.....
He zipped me right off to CVS 
where we picked up some butterfly band aids 
 and then he taped me together just like a real pro.
However.....
It hurts like a son of a gun,
so I'm going to stop here.
I know, I know, if I hadn't taken so long to tell you my tale of woe,
 I could have shared more decorating.
However.....,
I like to complain.....
Latah, Gatah
Photobucket

Friday, October 5, 2012

Betsy's Bodacious Ballroom!!!!!

O-KAY CAMPERS!!!!!
Let's continue the story of the Back Bay Ball Room.....
Design Times Magazine/ Eric Roth Photography

For those of you joining the party late, the story begins here.....

SOOOOOO......
as I was saying.
I was able to go hog wild in my use of the Sanderson Fabric.
I could choose any fabric that made my little heart sing
 (as long as Sanderson approved it.....)
So.....
quelle surprise!!!!!
I CHOSE A CABBAGE ROSE!!!!!
I am truly a sucker for a tea stained look, and this pattern had the whole aged faded charm thing going for it.
One reader asked how I decided to do a red room.
Well, I don't decide on a color when designing a space.
I choose the fabric I like, and then work off its colors.
If I were to design around this fabric today, with today's styles and fashions, I would have chosen a cream color to match the rose fabric's background for the sofas and drapery trim.
But I did this room in 1997, and styles change.

One way I used to hold down the cost of a showhouse space, was to work with as much of the existing room as possible.
I was able to keep the color of the woodwork, from the painted window and door casings right up to the gaudy gold paint on the ceiling details and mirrors.
The great thing about the rose linen pattern, was the yellowy green leaves brought out the color of the crappy gold paint, and made it look like it was actually OK.
Normally in a room of this grandeur, the paint would have been a gold leaf, or a facsimile there of.
But this gold was like
 cheap radiator paint!!!!! 

Sooooooo.......
the mirrors were already on the wall.....
The chandeliers were already hung from the ceiling.......
So I did what any crazed decorator would do, and I had the walls covered in fabric.
LOTS AND LOTS OF FABRIC!!!!!!
I arranged the furniture to create a dancing area and a hanging out and eating area.
'Cuz that's what you does at a pahtay!!!!
In the dancing area I designed a dance floor that I had painted on MDF and placed in a cut out area in the middle of the wall to wall sisal carpeting.
(The floors of the room were really horrible, and I didn't want to have to refinish them. So I covered them with sisal.....)
Design Times Magazine/ Eric Roth Photography

The dance floor has a poem running around the perimeter that I wrote, 
myself!!!!!
I can't remember it......
It went something like....
"Kick up your heels and 
dance the night away,
Something, something, something,
Until the break of day."
OY, OY, OY,
my old mind can't remember......
I am such a hostage to detail, that I even went to a (cheap) shoe store to find a gold pair of heels.
Then I added the diamond clips!!!

I used to apply this kind of attention to things for my boyfriends....
They thought it meant I liked them.....
They didn't know that I am just project driven!!!!

At the end of the dance area was the dais for the musicians.
I had a semicircle made out of plywood and covered it in the sisal.
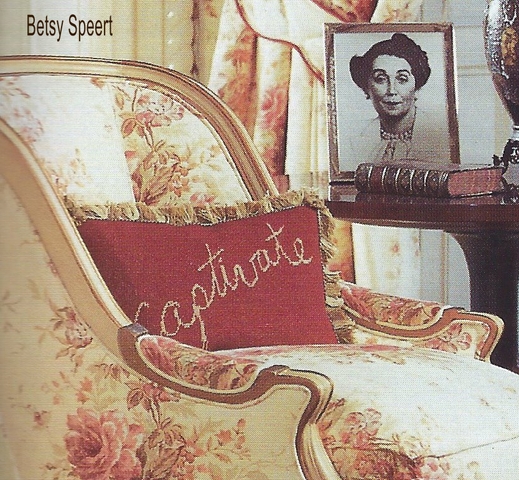
All around the ballroom were needle point pillows with 
pithy sayings!!!!!!
Designed by Moi!!!!!
Needle pointed by Moi!!!!!
For the musicians pillows I came up with four words that ended in "ate"
Coming up with those four words
 created much hilarity in the Speert Design Office.
There are lots of words that end in "ate".
Really good words.....
BUT I COULDN'T USE THEM!!!!
I am so grown up.....

So that's it for the dance area of this room.
I really need to go outside for my walk.
I had a check up this week and told the doctor that I walked at least every other day.
I am sort of a liar...

Latah, Gatah
Photobucket
Related Posts Plugin for WordPress, Blogger...