
I told you I would tell you,
Soooooo
Now I'm gonna tell ya!!!!!
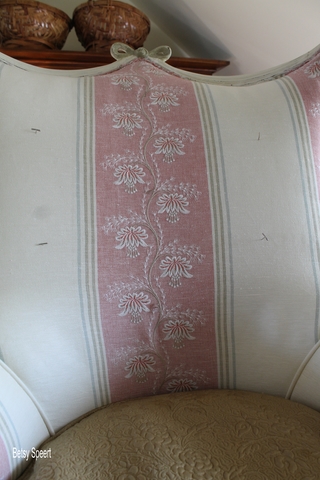
Here's the chair to date.

Adding buttons is fun.
So enjoy it,
'cuz I find most everything else is scary when I do upholstery.
The hardest part of adding buttons is figuring out their placement.
I use large T pins to help with the arrangement.
(See the spot in the center left????? That's on my camera. OY. I have to get this fixed and I don't want to be without my Cannon for any time at all.....)
Anyway...
first I placed the pins where I thought the buttons should go.
It's hard to see.....but there are three in the center.
Then I stood back and thought about it....
Then I added two more pins.

You have to do this with the cushion in place, otherwise the buttons won't relate to how the finished chair will work.
It's important to make sure the buttons are level and line up properly.
That's the hardest part.
I used a level for the horizontal placement.
For the vertical lines, I had the buttons on the sides relate to the stripe, so they curved down and in towards the seat.
Then I got out my lethal upholstery needles!!!!!

Chose one that would be long enough to stick through the back of the chair.....

I threaded it with my upholstery thread.....

And using the pins as guides, stuck the needle in where the pin hole was.....

Pulled the tread through to the back of the chair.....
leaving one end of thread in the front of the chair.
Then I....
Pulled the needle off the thread and threaded the twine that was still sticking out the front of the chair through the button and then threaded the needle and stuck it again through the chair and out the back.

Then I pulled the thread taught and just let it hang there for a while.

I did this to all the rest of the buttons, just letting the thread hang down in back.
This way, if there were any boo boos made, I could re-position the buttons


I decided that I hadn't screwed up.....
so it was OK to keep going!!!!!
I pulled the button taught, pulling till I liked the way it looked.

Then I stapled it in place on the back of the chair.
The way to secure the buttons, is to attach the string to the closest wooden part of the frame.
Staple the string down, then pull in the opposite direction, staple again, then, pull it back and staple one last time.

I continued to do this with the rest of the buttons.


Then I checked that I liked the way they were set into the back.
I didn't cut any thread untill they were all done, in case I wanted to adjust any tension.

Once I was satisfied....
(don't freak out.....but I got it on the first try!!!!!)
I cut the excess string.

I placed the cushion on the chair, just to be sure.....

and then I took a picture to memorialize my progress!!!!!

Soooooo.....
Here's the progress collage for your enjoyment!!!!!

It's now time to start on the back.
It's GOT to be easier than the front.
On that note,
Latah, Gatah


.jpg)
.jpg)
.jpg)


14 comments:
Very interesting.....can you just double knot the two thread ends, would that hold?? I always wondered how this was done.....like a giant puzzle.....I've learned so much from you!!!
The thread has to be attached to the frame. I'm just showing you guys the way I was taught. I am by no means an expert!
Oh wow, so that's how it's done. At the risk of repeating myself...the chair looks awesome!!! Vikki in VA.
Your abilities are amazing Betsy! Thank you for sharing. Appreciate your due diligence in completing every step to perfection, and the photo journal.
I never knew that, either! Thanks for showing us all those details--I've enjoyed each installment!
Martha in Mich.
I am strangely fascinated with this process, to the point that I study every step, even though I know I will never, EVER attempt this at home. Still think I need a cigarette though. Best, Beth C.
The chair is going to look beautiful. Paula
Betsy, You got it goin' on! The chair is looking fabulous and the buttons are perfect.
Hmm.....I didn't know that you were suppose to attach it to the frame.I love the chair more than the first time I saw it, you are a genius Betsy. Can't wait to see how the back goes.
It's lookin' good Betsy!!!! It is going to be a real wowzer when you finish.
My sweet hubster ordered two of your books for me. I am in 7th (Betsy) heaven.
You are great!
Blessings,
J
I can hardly wait for the grand finale. This is looking so beautiful. Do you use some sort of stain repellent on a light fabric? Or can upholsterers do that for you? I can just see someone working a crossword puzzle in that chair and making a stain. Would you let them live?
Since this chair, is going in a guestroom! It will get very little use. When Kris's daughter comes home to visit, Kris plans on throwing a sheet over the chair for protection. She knows her children well!!
I am so impressed with the chair! Wow!
I can't wait to do this to my new chair in my bedroom! I loved its colors and I wanted to add some designs! Upholstery project on the way!
Post a Comment