

I've been taking upholstery classes in adult education after I head south in the winter. One of the problems I have is finding pieces to work on, since I don't have anything left to recover in my Florida home. So I roam my neighborhood, looking for someone (anyone) who has a piece to work on. My neighbor, Jennifer, had this chair that her mother gave her from her grandmother. It had been sitting in her garage for a year, and her mater was starting to get peeved. Her hubby, didn't want to spend a lot to redo it (MEN!), so she let me redo it with the understanding that if I screwed up, she wouldn't yell at me.
 |
| Here's the back view. |

The arm had pretty detailing, but I didn't like the finish of the wood, so I stripped it and sanded it down, and waxed it to give it an older beat up look. Then I had to find a fabric that Jen and I would both like that would work with the direction her decorating would take (with some subtle nudging from ME). I found a pretty blue stripe on the Ralph Lauren web site and had some samples sent to me for our approval.

Here it is all beat up to look more beachy. (Is there such a word as beachy? My father would say; no. But this is my blog)

Here we all are in class at the local high school, each at our own work station in the shop classroom.

This is the shop god, Ernesto, our teacher! We are all like baby birds, chirping for his attention. HE KNOW EVERYTHING ABOUT THIS UPHOLSTERY STUFF!!!!

So I stripped the chair down to its frame and redid the webbing under the springs. Then I sewed the springs back onto the webbing and tied them together. (I can't believe, after all these years, I now know how to tie springs, except I did it the hard way, and now I know you can use a continuous piece of twine to go across the whole row)

Then I covered the springs with a layer of burlap and stapled it down with my new trusty staple gun. I bought a small compressor from Home Depot for just around $100. I got the staple gun from a vendor on ebay.
 |
| Then I added a rolled edge called fox edge |

I then placed a layer of foam and covered it all with Dacron, but I don't have pictures of this part, because I have lost my mind and forgot to document this part.

When I reworked the back, I liked the way the shape narrowed at the bottom, so rather than repeat the silhouette of the original upholstery, I followed the outline of the frame. I liked the way it was more wasp wasted.

The way to add buttons to the inside back is to thread them through to the outside back and staple them to the frame.

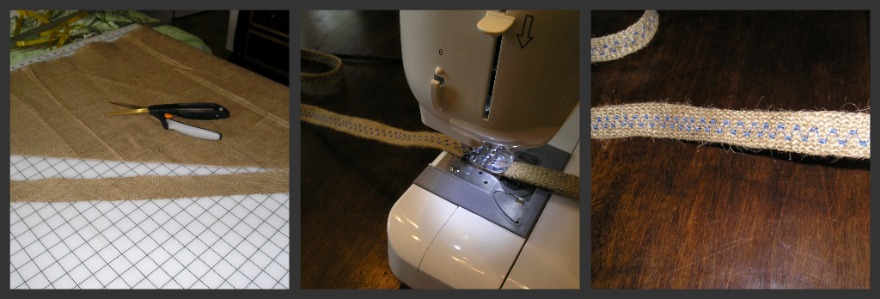
I added a contrast welt (piping) around the top of the back and then covered it with the striped fabric. For an added splash of design flair (and I wanted to see if I could do it) I outlined the back with a decorative tape applied with nail head tacks.

I made the tape out of burlap and a blue thread that I sewed on my zigzag sewing machine.

I made another decorative tape ( I am soooo creative) out of some of the blue stripe of the fabric turned inside out. Always check how the back of the fabric looks, as it can be used as a contrast fabric to the front. I applied this tape around the arm openings, rather than use a double welt traditional detail.

I used a double welt around the bottom of the arms

Here's the chair in all its glory before it got its skirt (it has no shame). That's my PT Cruiser in the back, my garage is my workroom.

I love skirts on some chairs, I feel they add a flirty fun feel, so I decided to make my life harder and add one to this chair.


To solve the problem of how to bridge the space over the legs, I worked out this button and loop detail.

Here's the back, outlined with the contrast tape and nail head trim.

So, here's the finished chair, waxed frame, new striped cover and dress-maker's details. I made my friend Jennifer really happy, and I got to do a project and then get it out of my house (since I have no more room).


Linking to: French Country Cottage


.jpg)
.jpg)
.jpg)


31 comments:
Thank you for showing step by step! I have so been wanting to learn some basic upholstery (nothing so grand as your chair there) and hope to find a class around Omaha. You give me great hope that I too can do it one day! The chair turned out lovely, and I like how you the nailhead and different finishing techniques. If you were closer I'd give you a chair to work on...lots of 'em! Deb
Great job, Betsy! Love the little pleated skirt!
Betsy,
I'm only an hour and a half away. Can I bring a couple of chairs and can we go shopping for material and trim stuff?
If you are just learning, Wow! By the time you graduate you will be the Michaelangelo of upholstery!
Ana Maria
The chair came out great Betsy. I loved watching the process~so interesting seeing how you made the burlap tap etc...the little skirt is fab too.
I love the dress-maker detail, very impressive! I took a class just like that about 20 years ago and loved it! Now I'm taking a stained glass class.... since I also have no room for more chairs.
I have been wanting to learn upholstering forever! Your post is very helpful! I have done one chair and it turned out OK considering I had really no idea how to upholster :-) It was done in simple left-over muslin just to "see if I can do it" with only glued on gimp as trim...I love the fabric you chose, the details are wonderful and the chair's shape darling! Thanks so much!
Wow! what a great job you did, why can't I have a neighbor like you, who just roams the streets and begs to redo my furniture for me.LOL
Blessings,
Amy Jo
Aaaak! That is AWESOME! My neighbors are all on oxygen so I don't think I could find one to help me with upholstery.
And you make it look so easy (not really). "First I waved my magic wand, did a little work here, a little more there, whipped us this little skirt, and there ya have it!" I'm going to look for a class around here. I have a love seat in dire need of attention.
Beautiful job! I love it.
Wow....great job, you are one talented lady! You have inspired me into thinking of taking a course on upholstery, what a good idea. Following you, Diane
Awesome! I've always wanted to take a class! Came out lovely! :D
Visiting from French Country Cottage's Feathered Nest Friday linky party today,
~Suzanne in NW Illinois
Merry Christmas!
Nicely Done!!! It looks great & I LOVE the button detail...
(stopping by from BNOTP)
I love!!! the skirt with the button detail. Gorgeous! It totally makes the chair. (wish you lived by me, I'd find something for you to reupholster and promise to not yell at you ;)) Little Bit from DecorateWithaLittleBit.com
Wonderful makeover on this chair!
The details are wonderfully thought out.
I like the little skirt and button; very clever!
Pat
That is so cute I can hardly stand it! Thanks for sharing at Overflowing with Creativity! I’m excited to continue being inspired by you in 2012!!! XO, Aimee
PS I'm your newest follower,
Love this! I am going to try a chair myself, but alas, I have no Ernesto. (dammit.) But anyone who can do a spot-on box pleat? Rocks.
oh my goodness - you did a wonderful job. It's absolutely gorgeous. I love your contrast to the striped upholstery and especially that loop & button detail across the lower arm brace. Outstanding craftsmanship!!
adorable! that little pleated skirt adds so much charm! i love it paired with the classic blue stripe, too!
GORGEOUS!!! NO other word to describe your finished chair. Thanks so much for sharing your step by step instruction. I've always wanted to take an upholstery class and now I am going to do it. I'm your newest follower, would love for you to follow back. Heather
I don't know what happen to my initial post so if it shows up twice, I apologize. Your upholstery project is amazing. It inspires me to take an upholstery class which has always been on my bucket list. I am your newest follower. Would love for you to follow back...Heather
I love that chair! You did a wonderful job. I just paid a fortune to have 4 chairs and a sofa done, but they were better than what is sold now.
I am following!
OMG...simply beautiful!! I truly love all the details that you put into that stunning little lady!! Jennifer is one lucky, lucky gal to have you as a neighbor. In case you want to winter in Georgia, the house across the street is for sale and I have a house full of pieces just screaming to be reupholstered!
What a wonderful job you did on that old chair, and thanks so much for recording it with photos. You've inspired me to try this on an old chair I have. Thanks so much! Love all the photos of your home too. You've given me encouragement to get to work on my own home.
AWESOME! I fascinated with your gusto! I'm your newest follower!
Monica.
Great to read about DIY Upholstery. Thank you for showing the step by step to the process!
Yes, I am reading one of your posts from 2011, and all the time thinking "you are Da Bomb, Betsy, you are Da Bomb!"
I am so inspired by you as you make it all look so do-able.
As my 23 yr old daughter would say, "Totes adorb!" A combination of crisp, playful, tailored, and artsy. Those frog-type loops over the legs...precious. Your eye and mind for details make this chair a stand out.
Very nice job indeed. If you ever have any more upholstery projects you might like to check out this site http://www.britishtrimmings.com which supplies a range of trimmings, tiebacks and tassels for window treatments, soft furnishings and upholstery. Just a thought! Keep up the good work.
You did a fantastic job on this chair!!! I am just starting to learn upholstery :O).
I think you did a great job!I love the skirt! I seldom see chairs with those kinds of design. I really need to do more upholstery!
GORGEOUS! I'm inspired to do the stripping/waxing on a chair now too instead of just re-staining it. Love the improvisation around the bottom of the arm!
You give us courage, Miss Betsy! <3 <3 <3
Post a Comment