Showing posts with label kitchen renovation. Show all posts

Tuesday, March 6, 2012

OY VEY!! Q&A!! Tuesday!!


Oh Boy!!!!!!!!!!!!!!!
It's the first Tuesday of the month!!!!!!!!!!!!!
So, you guys know what that means!!!!!!!!!!
You ask some design questions,
and I answer them for FREE!!!!
Just remember-----
YOU GET WHAT YOU PAY FOR.
(Just sayin')

But first, 
Some more horror stories about my kitchen............

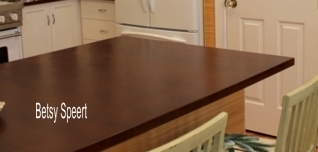
We will now discuss the wood countertops.
This is my story.
When I met with the guy from the cabinet shop,
I showed him my server in my dining area, and told him that I wanted the wood to match the mahogany.

This piece, right here!!!

Then he got fired. YEP!!! This was a year later, things were taking forever in Florida, it was the middle of the building boom, 
and you couldn't get anything done!!!!!
So the shop owner took the job over, and went by his notes.
He had just put down that I wanted mahogany, not that it was to be stained.
 If you don't know this, 
MAHOGANY IS A LIGHT COLORED WOOD.

So the big day comes, and they take out my white Formica countertops!!!

Yeah, baby!!
Then they get ready to bring in the new wood ones.
Alright, I gave you guys a heads up about what's coming.
I went out to the truck to see my new counters,
OH NO, OH NO, OH NO!!!
They weren't stained. They weren't stained. They weren't stained.

So I says, says I.....
YOU AIN'T BRINGIN' THAT IN HERE!!!!

They were not pleased with me.
Well, I wasn't pleased with them!!!
so there.

Now, I have no countertop at all.
None.
Nada.
Zip.

So they take it away to stain and refinish.
OF COURSE THEY DIDN'T DO A PROPER JOB OF STRIPPING THE OLD FINISH OFF. 
So now, when my dark stained wood countertops are nicked, I can't use a touch up stain stick, because there is a resistant finish under the #$% stained top coat. 

THE WHOLE PURPOSE OF A WOOD COUNTER, IS THAT IT CAN BE TOUCHED UP AND FIXED.
It still looks pretty damn good though.

I made up a squirt bottle of water and Murphy's Oil Soap, that 's what I use to clean my counters, and shine the babies up.
I've had some questions about the counters.
To answer them.....
YES, they get scratched, and get beat up.
I LIKE BEAT UP!!!!!

Now, on to the floors.....
This is what the house came with.....

So, I found these wonderful porcelain tiles that looked sort of like handmade Mexican ones.
I was referred to some really nice tile guys, who put them down for me.
Not, Jarred,
 (who I talked about previously) 
(this was before I found him)
I had to go out on a job, so I set the tile guys up, and left my house while they did the demo.
WE NEVER DISCUSSED THE SIZE OF THE GROUT LINES.
(I forgot)
Boy, on my own house, I am so sloppy in my overseeing.

Sooooooooooo
I come home, and they are very proud of their work.
As well they should be,
they did a very good job.
Just ONE PROBLEM!!!!!!!
The whole point of these tiles is to fake a handmade look.
This can only be achieved with a wider grout line.
They made it really small.
They were very proud.
OY, OY, OY

BUT I'M OLD, AND I GOT OVER IT.
LIFE'S TOO SHORT.

Now, don't go asking me what tile this is. I don't remember.

Next post, 
I will go over all the pretty goodies in my kitchen.

BUT NOW....
ON TO THE Q&A!!!!!!

This is the dealio, 

This is a question and answer party!!!!!
Only questions, please you guys. 
If it isn't a question, I'm taking the @#$ link down.
 link up to the "party" by linking a particular post's url, add your question to the end of your post with a link back to my blog. My button is on my sidebar. 
It looks just like a button!!
For those of you who don't have a blog, you can email pictures with questions.
email me at:  betsyspeert@gmail.com.
If you just have a question, with no pictures, leave it in the comment area, below.

IN ORDER TO GET AN ANSWER, YOU GUYS BETTER BE A FOLLOWER!!!!!
It's easy, just click on the blue box at the right; over the pictures of my members.
I would also love it if you became a subscriber.

I will then post your pictures with my suggestions and answers on the following Tuesday.
I may not be able to answer all the questions.
If there are a lot of them, I will choose the ones most likely to interest the other folks in the class.

So link up below!!!!!
Click  "Click here to enter"

Photobucket
 linking to:  

Sunday, March 4, 2012

Betsy's Kitchen Nightmares

                   
My next door neighbor has been giving me a hard time about my spelling.
Well, maybe I'm not such a great speller,
BUT...
She's not such a great reader.....
I have clearly stated in my bio, that I can't spell worth a damn.
My OLD friend June, lets me know when spell check lets me down.
I spell mantle, when I should be spelling mantel.

THEY BOTH SOUND THE SAME!!!!!
If you can tell what I mean when I'm talking.....
Then why the #$% does it make a difference to spell them two ways????

IF SPELLING WERE SO IMPORTANT
"NOP" WOULDN'T BE STUCK
SMACK IN THE MIDDLE OF 
THE ALPHABET!!!!!

Oops!!!!!
I meant to spell nope....

A few years ago, my mom gave my siblings and me back some of what she had been saving over the years of our childhoods.
I got back all my Elementary School report cards.

EVERY ONE said things like.....
Betsy is an engaging child, interacts well with others (blah, blah, blah)
BUT
her spelling is a problem. It may cause problems with her in the future.
(Yes, I know, I wrote problem TWICE!)
WELL.......

FAKE OUT ON THEM!!!!!
Along came computers and SPELL-CHECK!!!!!

OK.....
Actually, along came JUNE.
If you can't spell....
ALL YOU HAVE TO DO IS HIRE SOMEONE WHO CAN!!!!!

So....
To my snarky next door neighbor Mary
(now everyone knows who you are!!!)
GET OFF MY BACK!!!!!

When you're as old as I am,
folks are supposed to give you a little slack, #$%!


~~~~~~~~~~~~~~~~~~~~~~~~~~~~~~~~~~~~~~~~~~~~


NOW BACK TO MY KITCHEN
Lets talk about the appliances......
When I bought the house, it came with a working stove, dishwasher and frig.
THEN....
I got a letter that there was a recall on the dishwasher
Seems, they could catch on fire
(no biggy)
SOOOOO...
that was going to have to be changed.
Then, one night, while I was happily watching TV,
I heard the pleasant sound of a babbling brook.
It took a while for me to realize that that wasn't an appropriate sound in the middle of my house.
Soooooooooooo
I get up and wander into the kitchen, and see a TON of water all over the floor.
Water was pouring out of the door water dispenser.
HOW TO TURN THE @#$ THING OFF?????
IT WOULDN'T STOP!!!!
(I figured it out, the turn off is under the kitchen sink)


Okay Dokey.....
Since two out of three appliances were having issues, I decided to replace
ALL OF THEM!!!!!
YAY!!!!!!


Another excuse to spend money!!!!
YIPPEE!!!
So, I decided that, as long as I was spending money,
why not spend A LOT of money?????


And this is where my new stove comes in!

Viking (bless their hearts), must have come to the realization that,
even folks who didn't have gas running to their houses, like the look of a professional range.


I love my stove, I love my stove, I love my stove.
It's a completely frivolous way to spend moulah, it doesn't do anything that a regular electric range can't do.
But it sure is PURRTY!!!!!! 


So this is the way it looked with the Mexican mistake tile.
I had the microwave/hood over the stove that came with the house.
So, as I told you guys on Friday, I lived with the tile for three years, couldn't take it any longer, and changed it to light green subway tile.
I mean, I just couldn't stand this look another year.....


I am being a sadistic bitch, making you look at these pictures.
Well, I had to live with it, so suck it up and be brave.


Boy, when I make a mistake, I make a doosey!!
I only experiment on myself. Clients don't think it's funny, when they spend a lot of money and it turns out looking like @#$.


So I changed it to this.....
Much better!!!!!!
It's a Pratt & Larson tile.

I know it's a good use of space to stick the microwave over the stove,
but I have rotator cuff issues.
Also, the vent fan doesn't work as well as a real hood.
Sooooooooooo...
Then I was really LUCKY and the microwave turntable broke, and then the handle broke, and THEY DON'T MAKE THE PARTS ANYMORE!!!!!
So I was able to justify changing to a HOOD!!!!!
Yeah, baby!!!!


Sooooooooooooooo.....
I ordered the viking hood. It looks like this....

I was sooooo excited, 'cuz it was in stock, so I got it in less than two weeks!!

The big day came, and the installer arrived with my fancy new hood.
He took down the old microwave...

(there was great rejoicing in the Speert household!)

And then he 
took the mounting plate off the wall.....

And that's when we saw the BIG @#$ PROBLEM!!!!!

Yep, when I had the backsplash retiled, of course they didn't go up behind the microwave.
THERE WAS NO REASON TO GO THERE!!!!!
But the hood is shorter than the microwave, so the white tile would show.
OY! OY! OY! OY! OY!

Sooooooooooooo....
The nicer installer guy, put the Viking hood in my garage, and I started scheduling workers at the speed of light.

I called my tile guy 
(luckily, I had enough left over tile to fill in the needed space)
OK, remember this picture?????

This is what happens when you pull tile off my walls. the sheetrock comes off too.
(OY! OY! OY! OY!)
So I had to get my trusty go-to guy, Chris Haire, pull off the tile and re-sheetrock.

Here he is finishing up with some calking.
(bless him, bless him, bless him)
He's my fix-it guy, and watches my house for me over the summer.
Most of the advantages of a husband, but because I pay him, 
I don't have to live with him!!!
NEXT!!
was my tile guy, Jared Staley (561-596-0816)
I told him I would give him a plug!!

When he first started working for me, he was in his twenties, NOW, he's a 
DAD!!!!!!
So, the tile was installed....
and grouted.....

And then the exciting day came to put the hood up!!!!!
YAY!!!!!

OH NO!!!!!
YOU HAVE TO BE KIDDING ME!!
The hood only vents out the top.
IT DOESN'T VENT OUT THE BACK!!!
It needs to be able to vent out the back.
IT CAN'T DO THAT!!!
IT CAN'T DO THAT!!!
IT CAN'T DO THAT!!!
I am totally @#$!!!!!!!!

Sooooooooooooooo............
The nice installer guy, carries my beautiful Viking hood back out of my 
HOUSE OF DECORATING PAIN......

Now is the time to hit the internet with a vengeance. 
I was damned if I wasn't going to find a substitution that could vent out the back.......
(This is what happens when a hot shot famous kitchen designer, tries to retrofit an existing kitchen. I am used to complete gut jobs, where I don't have to worry about this piddling @#$)
Two days later......
I FOUND ONE!!!!!
YAYYYYYYYYYYY!!!!!

From VentingDirect.com.

Whew, that was a close one. I was worried that after all that work, I was 

going to have to put up another microwave!!!!

All right folks, 

I will continue sharing more about this kitchen this week.

DON'T FORGET!!!

THIS TUESDAY IS THE FIRST TUESDAY OF 

THE MONTH!!!!!

OY VEY!! Q&A!!

TUESDAY!!!

See ya later

gator

Photobucket

Friday, March 2, 2012

My Tropical Cottage Kitchen Renovation


Today I am refreshed, renewed, revived, 
but mainly, I am
RELIEVED!!!!!

Thanks to Sarah for fixing my feedburner issue!!!!!!

Now.....
Back to my Florida kitchen...................

This is where I am now!!!!!!!

This is what it looked like when I first viewed the house with the real estate agent (those bar stools belong to the previous owners. OY!)


As I told you, when showing off my living room.....
I extended the wall, and closed up the pass-through over the sink....


This is the same view now......


......................but the wall cuts off the view of the kitchen.


THIS IS THE STORY OF HOW I GOT FROM 
THERE TO HERE!!!!!
First to be changed, as I mentioned numerous times: Close the hole, and extend the wall!!!!!
(and wall paper anything that wasn't moving!)


The next thing I tackled was changing the doors and drawers.
The original cabinets had partial overlay doors.
Those are doors that overlap the frame of the cabinet, but still show part of the frame.
I don't like that look. I don't like that look.
 I don't like that look!!!!!


give me either a full overlay
 (where the doors cover the whole front of the cabinet.)
Or
an inset flush door 
(where the doors are set inside the frame of the cabinet.)


Sooooooooooooooo..........
Keeping the idea of being fiscally prudent (HA!)
I just changed the cabinet doors and drawers to a full overlay.
I drew the doors I wanted, and had the cabinet maker make em!!!
I found some 1940's looking hardware at Restoration Hardware.


I love me a funky pull!!!!!


Here's a full overlay door and drawer.....


Soooooooooooo..........
Then I added a header and crown detail to the top of the cabinets.
DON'T JUST ADD A CROWN!!!!!
NO NO NO NO NO!!!!!
Add a board, a half round, and THEN the crown molding. 
LIKE THIS!!!!!


It just looks a lot gooder!!!!!
Rather than just having a crown molding stuck on top.
It's relatively easy to add. (HA!)
No really, it is.
The half round molding covers the crack between the two inch board and the top of the cabinet.


To deal with the empty space where the pass-through hole had been 
(over the sink)
I designed a plate rack......


I am SOOOO CLEVER TO ADD THE MAGNETIC STRIP 
FOR A KNIFE RACK!!!!


Then I had the countertop changed to a dark stained mahogany to match the dark furniture in the dining area.
I feel it gives it more of a West Indies vibe.
(The dark wood furniture, not the countertop!)


Then I made a BIG mistake, blunder, boo boo, #$%up. 
I chose a tile that I loved, but looked
HORRIBLE
when installed.


SEE????
It looks really BAD


Way too busy, and way too dark!!!!!!!!!!!!!!


So then this happened!!!!!!!!!!


I lived with it for three years.
Girded my loins.
And had the @#$ stuff removed!!!!!!!!!!!!!!
YAY!!!!!!!!!!!!!!

I'm going to stop my story here, and pick up at the same point 
NEXT TIME!!!


See ya later, alligator!!!!
Photobucket
Linking to:  


{nifty button}you are talking too much
Delectable HomeBoogieboard Cottage

UndertheTableandDreaming

Button

Home Stories A2Z


No Minimalist Here

shabby creek cottageHookingupwithHoH

        Photobucket           French Country Cottagevif187


Redoux

Related Posts Plugin for WordPress, Blogger...