Thursday, February 27, 2014

Slipcovered Slip Seats for Miriam's Dining Room

Well, Connie closes on her new Florida home today, so I can start blogging my little heart out about it.....
But right now,I want to show you my latest sewing project for my niece Miriam.
Last year I did her dining room.....
if you've been following my blog, you may remember it.
I had.....
painted the sideboard....
painted and reupholstered the side chairs....
upholstered the walls.....
made the draperies.....
painted the chandelier.....
BUT I HADN'T GOTTEN AROUND TO THE HOST AND HOSTESS CHAIRS......
These chairs are Chinese Chippendale that I inherited from my grandparents' apartment in Manhattan.
I had used them in my living room in my Watertown cottage, but had no use for them when I moved.
SOOOOOO.....
I gave them to Miriam when she bought her home.
Needless to say, the needlepoint seats didn't go with the dining room decor.
And Perla the Wonder Dog, managed to destroy them in just a matter of months.
Sooooooo.......
this winter, I finally got around to doing them.
This is the before.
I wanted to make slipcovers that were the same fabric as the other chairs, walls and draperies.
First I made a template out of drafting tracing paper......
I folded the paper in half, and just cut out one side.
Then I folded it back in half and cut the other side to match the first side.....
Then I laid it back on the chair to make sure it was the right shape and size.....
Then I pinned it on the fabric, centering it on the part of the pattern I wanted in the middle of the seat, and got ready to cut the fabric.
I was going to cut it with an extra half inch around, to accommodate the seam allowance.
Then I had a brain fart, and forgot to add the half inch,
Luckily I was able to use this piece for the skirt.....nothing like wasting fabric.
You should always buy extra fabric for screw ups if your name is Betsy.
Soooooooo......
I had to start again, and make a template, this time with a half inch allowance added in, so I couldn't make the same mistake.
I've been known to remake mistakes 
over and over and over and over again and again and again........

So, now we're back to where I was before I messed up.
I pinned the template to the fabric, making sure the pattern was centered.
Then I cut the first section.
I wanted the two chairs to have the same part of the pattern in the same place, so I lined up the repeats and used the cut fabric as my template for the second chair.
I checked it all the way around to make sure it matched.
Now I had two somewhat similar pieces!!!!!
Next it was time to make the welting.
I used the same fabric that I had used for the back pillows on the side chairs.
I like to use contrasting welting.
It sets off the lines of upholstery.
I sewed the welting to the seat piece.
At the leg cutouts, I folded the welting under.
For the parts of the top that wouldn't be sewn to the box pleated skirt, I sewed a
 (senior moment....I can't think of the name.....) 
you know, a piece of fabric to the underside.
I just remembered!!!!! It's called interfacing!!!!!
It makes for a finished edge.
Then I top-stitched it in place.
Then I checked it on the chair.
Making sure I liked how it fit.
Next, it was time for the skirt!!!!!
I cut pieces that were twice as long as I wanted the skirt to be, adding another inch for the seam allowance.
I folded them in half and ironed them to create a nice sharp edge for the skirt.
Then I went to my fabulous new serger.....
and serged the edges together, so there would be no unraveling.

Now it was time to figure out the box pleating.
I pin basted the skirt to the seat piece, figuring out the pleats as I went.
They didn't have to be exact because I would have lost my mind if I worried about that.
I sewed the front skirt on and checked it out.
Tried it on the chair.....
Did the side.....
Did the back.....
Then I ironed the pleats to give them a sharper crease. 
Now it was time for the ties.
I first was going to do cords I made out of the solid blue fabric, to tie on the chairs, but I didn't like the way they came out so I switched to a buttoned tab closure.
In my sewing machine manual, there is a page for button hole sewing.
I disregarded it's instructions for sewing them for thick stretchy fabric, and the first one came out looking like this.....
Not such a nice look.........
Sooooooo.....
I read what I should have done to begin with, 
AND LO AND BEHOLD!!!!!
THEY CAME OUT NICELY!!!!!
So, I went ahead, and made seven more of these tabs.
Sewed on the buttons, buttoned on the tabs, 
and pinned them in place to make sure that they fit.
Then I sewed all the tabs on.
(This was taking a while, Miriam is soooooo lucky.....)
Finished side view.....
Finished front view.....
Side by side.....
No one would know the mess that's underneath the slipcover!!!!!
I'll have to show you how they look in Miriam's dining room, but I'm not driving up to her house today.......
There's all this white stuff on the ground, and the thermostat is stuck under 32.
What's a Flerida girl to do???????

On that note,
Latah, Gatah
Photobucket


Sunday, February 23, 2014

Little Sleeping Porch by the Ocean

Today I'm going to wrap up the Cape Cod Academy Showhouse room I did in 1995.
You guys are soooo lucky!!!!!
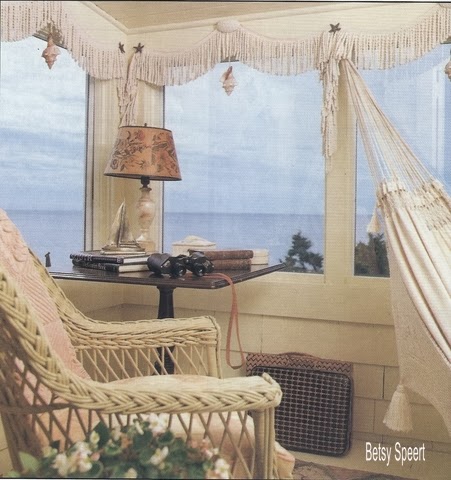
Off the attic bedroom was a little sleeping porch that I set up as a small sitting area with hammock and chair.
This was the perfect place to snooze and read and just gaze at the ocean.
Traditional Home Magazine 1995
To match the bedroom, I had the walls ceiling and floor painted the same color cream.
I wanted the two rooms to read like a suite.
This little porch was a jewel with it's view of the ocean.
For the window treatments I decided to go funky.
I had a bunch of natural un-dyed cotton bullion fringe that I looped and swagged over the windows.
I used to go to Pier One Imports to find fun unusual stuff.
I would re-purpose the hell out of everything!!!!!
Unfortunately, that store has gone the way of Corporate America, and become safer, more generic and less idiosyncratic.
But back in 1995, it was still fun and had jewelry and other unnecessary items that I could apply to my designs.
I found the pearl encrusted barrettes that I used to cover the nails in the middle of each swag.
I know you can't see the pearls in this picture, but take my word for it, 
they be pearl encrusted!!!!!
At each corner I hammered in a star fish pin I found in some catalog,
 I have no memory of where they came from.
So don't ask,'cuz I don't know.....
After all, this was a looooong time ago.
for the "tassels" in the center of each window, I hung a shell.
These were shells from Pier One that came with scented wax inside.
I couldn't stand the smell, so it took me forever to soak them and de-scent them.
Then
I had to drill a hole in the tip of each one.
Soooooo
I got out my trusty drill, 
and I'm drilling
and drilling
and drilling.
It took me for #$% ever.
After I was all done, 
I realized that I had set my drill in reverse.
OY OY OY.....
Sometimes the things I do are so stupid it's painful.
I found the metal sail boat in a junk store and felt it was the perfect touch for the ocean theme.
The lamp was an old alabaster one I had knocking around, I stuck the vintage lampshade on it.
I loved this lampshade, why don't they make stuff like this anymore?????
Over the back of the wicker chair I threw a knit cotton spread.
It had originally been too purpley pink, and I wanted it a little more to the orange, so it would go with the room.
I had the brilliant idea to dip it in tea, and change the color that way.
This was the first time I had ever done tea dipped.
This was before you could look up anything you wanted on the internet.
Soooooooo
I filled up the laundry sink in my basement with hot water and stuck some tea bags in it,
 and let them brew, 
and then I soaked the cotton spread in the sink, 
with the tea,
and the teabags......
Sooooooo.....
After a while, I drained the water and wrung out the spread, and looked at what I had created.
It was definitely more the dusty rose color that I wanted,
BUT.....
there were darker brown squares scattered over the spread from where the tea bags had rested against the fabric.
This spread had been slotted to use on the bed.
OOPS.....
Soooooo....
I folded it up, so you couldn't see the brown squares, and laid it over the back of the chair. 
I found the hammock in one of the catalogs I used to get...
Don't remember where.
Don't ask me, 'cuz I don't know.....
It was really cool, it had tassels!!!!!
So, that's it for this room, I don't think there's anymore to tell.
Connie closes on her new house this week, and then I can start blogging about that.
It's very exciting and we've been working our tails off on it.

I'm going back up to Massachusetts on Tuesday, but I took pictures of the new landscaping I had done on my own house,
 so I'll be showing that in my next post.

On that note,
Later, Gator
Photobucket

Wednesday, February 19, 2014

Every Bedroom Should Have a Dressing Table!!!!!

OK Kampers,
I'm exhausted.
I've been antiquing with Connie all day, but I can't write about that for another week.....
Soooooo
in the meantime.....
let's go back to the attic bedroom I did in 1995 for the Cape Cod Academy Showhouse.

I love dressing tables in bedrooms for a couple of reasons.
They can be used for primping.....
but more than that they can look really pretty!!!!!
Sooooooo....
I put one in this attic room, because I knew it would photograph well,
and as we all know.....
It's all about the pictures!!!!!
Traditional Home Magazine 1995
I bought an inexpensive mirror that I thought would be cool covered in sand and shells.
It was really gaudy, painted in a garish gold.
Since I was going to cover it in sand, it didn't matter what the finish looked like.
 But first I had to find some sand.
When I looked around for sand, all I could find were large bags for filling sandboxes.
Sooooooo.......
I called a local brick and sand lot, and asked if I could just buy a little bit.
When the guy saw I only wanted a little bag of it, he charged me 5 dollars.
Looking back, I think I overpaid, but at the time, I felt like I got a bargain.
Sooooooo.......
I sprayed the mirror with adhesive, and sprinkled the sand all over it.....
making one very big mess.
Thennnnnnn.....
I glued some shells on it in a very artistic manner!!!!!
What I didn't realize, was that the shells were glued to the sand.....
and the sand could give way.....
so the shells would fall off!!!!!
I had to travel around with my gluegun.
VERY PROFESSIONAL!!!!
After the showhouse was over, I gave this mirror to my friend, Terry Hamilton, and she claimed that no more shells fell off.
Maybe I'm cursed!!!!!????!!!!
Being meeee..... just the mirror on the wall wasn't enough.
I needed more stuff.
So what does one put on the walls when one needs more stuff?????
Plates!!!!!
I was having trouble finding floral ones with a creamy background color.
All of the ones I found had very white tones.
SOOOOOOOO.......
I glazed some with a brown tone, and made them yellower.
By this time I had completely lost my mind,
I was really getting into the seaside theme. (wait till I show you the attached little porch I did.)
I found some seahorse charms, and stuck them into the top edge of the dressing table boudoir lamps.
Sailors' valentines are always pretty.
They are trinket boxes and other small items that sailors would encrust with shells for their sweethearts while they were away on the open seas.
This little mirror was something I found while poking around on the Cape, and I set it on the dressing table top for another ocean themed accent.
1995 was when I was in the height of my love of fringe.
I had this bullion added to the top of the skirt, just because I could!!!!!
It adds another layer of texture and color.
I was using scraps of fringe left over from other jobs that my workroom had lying around.
I had the little chair covered in a piece of tapestry I bought and held on to, having no idea how it would be used.
We had the piece edged with left over green velvet from the chair welting that I did across the room.
This chair was something I had picked up for a client, thinking she would like it for a dressing table seat.
I had planned on painting it white for her.
She didn't like it, SO I GOT IT!!!!!
All my best stuff is the things my clients don't want.
It's now sitting in my Massachusetts kitchen.
I am the ultimate recycler!!!!!
That's it for today, guys.
I still have this miserable cold.

On that note,
Later, Gater
Photobucket
Related Posts Plugin for WordPress, Blogger...