Wednesday, September 28, 2011

Table adventures (finding stuff for Miriam)!!

My niece Miriam turned me onto ebay several years ago, and created a monster. Now she's got me hooked on Craig's List. She needed a dining room table to go in her newly designed dining room that would work with the FABULOUS server I found with her. I combed the local Craig's List listings, and found the perfect table, well within her limited budget. While I was looking for a dining room table, I also found one for her kitchen, that was too wonderful to pass up. So now we are done looking for tables for food, and just need everything else in the house.

The great thing about this table, is that it has three leaves, so it can go from 66" to 102", depending on Miriam's needs. The double pedestals are nice and chunky. Miriam was thinking she wanted it painted, but I told her we needed to wait until the dining room was painted and the fabric up on the walls before we knew the direction we wanted to take with the finish. Ever since I painted the sideboard, she wants to paint everything. I may just give it a good waxing, and find some fun painted chairs to go around it.
I think the pedestals are really pretty, just need some work on the finish.
The fun thing about going to peoples houses to pick up stuff, is getting to sometimes see wonderful architecture. This table was in Gloucester MA, in a house right on the ocean. The detailing of an old beach front "cottage" is one of my favorites, and Sue the owner was nice enough to let me snap pictures to share with you guys. She and her husband are downsizing, now that the kids are grown, so she no longer needed a big table.

This is a view of the family room running along the back of the house. it used to be a porch that she enclosed. It looks out on the bay.

The view from the back is GORGEOUS!!

The butlers pantry had an arched door, I'd never seen one in a pantry before, isn't it stunning?


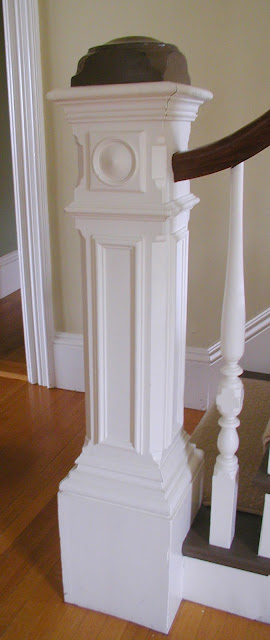
The railing details on the stairs were so wonderful, I snapped lots of shots to share.....

 I don't know why, but I always think of this kind of a newell post as a captains post.

Note the way the railing swoops up at the level change.

We were so successful with the dining table, I suggested that we check out this other table for the kitchen. (Another great bargain). Miriam wanted a rectangular table that could fit tight against the wall. Ross felt that a round shape worked better in the space. Soooooo.... I was able to satisfy both of them because I am a SUPER DECORATOR!!!!!
 
This table is a drop leaf that opens up to hold more leaves!! I have never seen one like this, and I have been around a loooooonnnng time.
So I figured that they could use it with one leaf down to fit against the wall, and one leaf up to curve into the room. When they had a lot of company, like at holidays with melding two families, they could add the extra leaves and have a second dining table set up in the kitchen just off the dining room. Now Miriam just needs to learn how to cook. (I hope I'm just kidding).

Friday, September 23, 2011

Miriam's Dining Room Continued

As we resume our story of the young lovers, Miriam and Ross,  continuing their adventure in the early days of marriage, we join them in their dining room........


I have a tendency to assume I (we) can do more than I (we) are capable of accomplishing. This is a nice way of saying I wanted Ross to get in way over his head in the dining room project. This is the ONLY time Ross has been right, and I have been not right. ( I refuse to use that other word). I thought we (he) could pull off the chair rail, rework the windowsills and replace the baseboard. He knew he couldn't. So we got my buddy and savior, Nigel Mernagh, to do the wood work details in our transformative project.

He pulled off the chair rails.............
and added a new larger baseboard..........

Then started applying the wood to create the paneling details.......

You can tell he's a professional, look at the size of that level!!! Then he added the vertical pieces.............

To save some moolah, Miriam and Ross decided that they would patch the walls and paint the room themselves, but first they had to learn how to spackle, and being the computer geeks they are, they researched it on line, and kind of got it right.

I don't know why he's smiling, there is still a whole #$@ load of work to do.
The corner cupboard was thick with gloppy old paint that had been painted over older gloppy old paint, and it was all pealing and crummy looking

So I talked her into stripping it, poor baby, she had no idea what I was getting her into. This is a picture of it partially stripped. I don't know if it will ever be finished, but we are forever hopeful.


Next weekend, we will finish the painting (maybe) and then I can start putting the fabric on the walls. Tomorrow Miriam and I are going to look at a great dining table I found on Craig's list, and if it looks as good in real life as it does on my computer, we will haul it home to join the sideboard I finished waxing last week.

Remember this? It used to look like this.......

I hope you all are enjoying reading about this project as much as Miriam and I are enjoying tackeling it. Ross is being a good sport, that's all we can ask of the new hubby. Stay tuned for the ongoing  adventures of the dinamic trio in decorating!!


Tuesday, September 20, 2011

Upholstery project


I've been taking upholstery classes in adult education after I head south in the winter. One of the problems I have is finding pieces to work on, since I don't have anything left to recover in my Florida home. So I roam my neighborhood, looking for someone (anyone) who has a piece to work on. My neighbor, Jennifer, had this chair that her mother gave her from her grandmother. It had been sitting in her garage for a year, and her mater was starting to get peeved. Her hubby, didn't want to spend a lot to redo it (MEN!), so she let me redo it with the understanding that if I screwed up, she wouldn't yell at me.

Here's the back view.


The arm had pretty detailing, but I didn't like the finish of the wood, so I stripped it and sanded it down, and waxed it to give it an older beat up look. Then I had to find a fabric that Jen and I would both like that would work with the direction her decorating would take (with some subtle nudging from ME). I found a pretty blue stripe on the Ralph Lauren web site and had some samples sent to me for our approval.


Here it is all beat up to look more beachy. (Is there such a word as beachy? My father would say; no. But this is my blog)

Here we all are in class at the local high school, each at our own work station in the shop classroom.

This is the shop god, Ernesto, our teacher! We are all like baby birds, chirping for his attention. HE KNOW EVERYTHING ABOUT THIS UPHOLSTERY STUFF!!!!

So I stripped the chair down to its frame and redid the webbing under the springs. Then I sewed the springs back onto the webbing and tied them together. (I can't believe, after all these years, I now know how to tie springs, except I did it the hard way, and now I know you can use a continuous piece of twine to go across the whole row)

Then I covered the springs with a layer of burlap and stapled it down with my new trusty staple gun. I bought a small compressor from Home Depot for just around $100. I got the staple gun from a vendor on ebay.

Then I added a rolled edge called fox edge


I then placed a layer of foam and covered it all with Dacron, but I don't have pictures of this part, because I have lost my mind and forgot to document this part.

When I reworked the back, I liked the way the shape narrowed at the bottom, so rather than repeat the silhouette of the original upholstery, I followed the outline of the frame. I liked the way it was more wasp wasted.


The way to add buttons to the inside back is to thread them through to the outside back and staple them to the frame. 


I added a contrast welt (piping) around the top of the back and then covered it with the striped fabric. For an added splash of design flair (and I wanted to see if I could do it) I outlined the back with a decorative tape applied with nail head tacks.

I made the tape out of burlap and a blue thread that I sewed on my zigzag sewing machine.

I made another decorative tape ( I am soooo creative) out of some of the blue stripe of the fabric turned inside out. Always check how the back of the fabric looks, as it can be used as a contrast fabric to the front. I applied this tape around the arm openings, rather than use a double welt traditional detail.

I used a double welt around the bottom of the arms

Here's the chair in all its glory before it got its skirt (it has no shame). That's my PT Cruiser in the back, my garage is my workroom.

I love skirts on some chairs, I feel they add a flirty fun feel, so I decided to make my life harder and add one to this chair.


To solve the problem of how to bridge the space over the legs, I worked out this button and loop detail.

Here's the back, outlined with the contrast tape and nail head trim.

So, here's the finished chair, waxed frame, new striped cover and dress-maker's details. I made my friend Jennifer really happy, and I got to do a project and then get it out of my house (since I have no more room).


Mod Vintage Life

Linking to:  French Country Cottage


Related Posts Plugin for WordPress, Blogger...