
Making a down seat cushion is something
I always wanted to try.
Sooooo.....
on Thursday I hauled my bum over to Drape It, the upholstery and drapery workroom that has been turning out my wonderful stuff for eons.
They have now, in my senior years, become my tutors.
Joe (the esteemed owner) probably figures that if I'm working on my projects it keeps me from playing in traffic.
Sooooo.....
I'm now going to share with you how it's done.
You have to make a down cushion from ticking, which has a high thread count and is a very tightly woven fabric.
It's necessary to have a tight weave so the feathers can't escape.
I'm sure that many of you have bought feather and down pillows, only to have the sharp quills poke you in the back.
THAT'S BECAUSE THEY AREN'T IN A GOOD TICKING!!!!!
Also, feathers have sharper quills than down, so they are like little spears and work their way through.
For this cushion I used 100% down.
Here's a picture of the finished uncovered cushion on the chair.

I still need to make the cover for it. I hope I can get to that today.......
Sooooo.....
Here's how you do it.
First make a template for the cushion.
I used the existing cushion after making sure it still fit on the chair.

I laid some lining fabric over it and pinned it in place.

Then I drew around the outside, using the welting underneath as my guide.
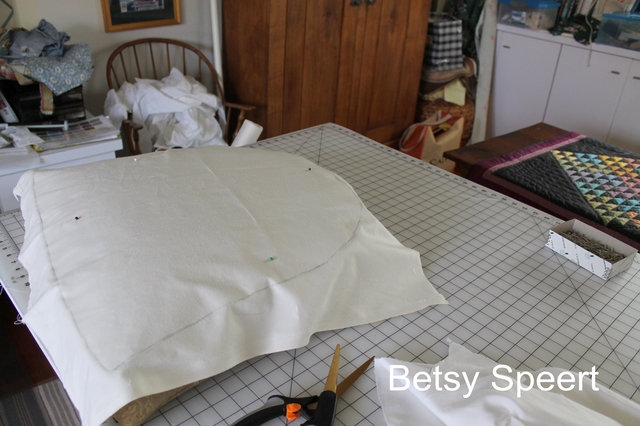
Then I folded it in half, and drew a line down the middle.
This way the cushion will be symmetrical.

I drew another line 1/2" outside the first one for my seam allowance.

I folded it in half and then I cut the sucker out!!!!!

Sooooooo.....
I carried the old cushion and my template over to Gilles at Drape It for the next step.
Here's a picture of Gilles, for all his fans out there.
The guy looks like a country singing star, doesn't he?????

I took notes, writing them on the template (Gilles idea) so I wouldn't loose them and they would be RIGHT IN FRONT OF ME when I needed them.
He calls the cushion form a "bag", so to be cool.....we will too!!!!!
The "bag" needs to be larger than the finished cover to create a nice full cushy form.

So, I drew a line one inch outside my template on the ticking fabric.....

and cut out the pieces for the "bag".

Because I felt a thicker cushion would look better, I increased the box sides by one inch, so that the finished cushion would have a 4 inch side box.
Gilles had me clip the centers of the top and bottom, so it would be easier to line them up when I sewed them.

I pinned the boxing for the side to the top, leaving extra where the ends met.

I sewed the side strip to the top.
When I got to where the two ends met, I seamed them together and clipped off the excess.
This way I didn't have to worry if I got the measurement wrong.
Then I pinned the bottom to the sides, making sure that the notched parts lined up, and that the corners lined up.,

Once it was sewn together, I burst out laughing......
I had sewn it completely shut.
I have officially lost my mind.
So.....
I opened up a 3 inch hole, and turned it right side out.
THEN IT WAS TIME FOR THE DOWN FILLING!!!!!
It comes in a big bag.

Gilles stepped in at this point and took over.
He is a control freak.
I was happy to let him.
He strapped on his manly feather defying mask.....

pulled out the compressor hose...

and attached the bazooka!!!!!
YEP!!!!
That's what it's called.

The lever loop below is what controls the sucking and spitting.
It sucks in one side and shoots out the other!!!!!

Here's a shot that shows what the down looks like.

I made my first video!!!!!
I forgot the camera had a video action, and remembered as Gilles was sucking up the feathers, so I didn't have time to figure the damn thing out.
I sort of screech through it for the voice over, as I realized that there should be some explanation of the action...I got flustered because he was going balls to the wall, and I didn't have time to figure the whole dealio out.....
so ENJOY!!!!
I filmed it sideways!!!!!
I edited it in Picasa, but that ain't working for me.
Oh wait!!!
I just checked and it's right side up!!!!!
I am da bomb....
(for some reason, the video doesn't show up on my IPad.)
I know....I know....
I SHOULD SEND THIS TO THE CANNES FILM FESTIVAL!!!!!
When he was done, I sewed it closed and proudly carried my project back home, just like a little kid returning from summer camp.
Here it is on the chair, I just have to cover it in the linen fabric and apply the double welting (which I made yesterday!!!!!)

I think the look of a down cushion is just so luxurious.
As this is for a guest room, it won't have to be fluffed up that much!


Soooooo.....
The next post will be the final one on this chair.
Can you believe I'm almost done?????
Kris is on vacation, so when she comes back she will be surprised!!!!!
It's so gratifying to make thing for my friends and family.....
the trick is to never let them forget it!!!!!
On that note,
Latah, Gatah


.jpg)
.jpg)
.jpg)


17 comments:
The chubby cushion is what makes it a "Betsy" chair to me.
That was fun. I really, wondered how they filled them. You could possibly enter your video at the Sundance film festival. lol Paula
Betsy - thank you soooo much for this post. I have wanted to make down chair cushions and this is going to be extremely helpful. If we don't have a Gilles in our life, I guess we just fill the ticking liner ourselves very carefully?
How fun, great tutorial and I had no idea how they filled the down cushions. Interesting. Hugs, marty
Oh how I wished that I had a Gilles in my life!
Yes,I can get furniture re-upholstered here- but nobody, but nobody will make me such a delicious, luxurious down filled cushion.
Too custom, I guess..
Thank you for this great post, Betsy.
Dolores
Thank you so much for this info, Betsy. I want to replace a cushion on my chair, but had no idea how much bigger to make it to account for glorious, fluffy down.
I have a down and feather-filled bag cushion that I had on a good quality sofa. But it went completely flat when sat upon - no springiness at all. So I had a foam replacement made with some batting around it, and it is flat and horrible. Was the problem too little down/feathers, or did it need some springs under the cushion?? I don't know where to go from here...sigh...
Carol,
Down has to be fluffed on a regular basis to stay cushy.
It needs the air added to create the loft.
That's the reason people change to foam.
You can create a foam cushion with a good sized crown if you add one layer of Dacron to the top and bottom and then wrap the whole thing in another layer of Dacron, but don't do the sides, just the top, bottom, and front.
But nothing looks like down.
A flat cushion can always be added to, to create the fuller look.
After all of this, now I know why reupholstry is so expensive! Beautiful job. It's a masterpiece.
Love the cushion, great video, learned a lot!!! This chair is da bomb!!!
It is amazing the amount of work that goes into upholstery. They really earn their money. Beautiful job on the chair. Good choice on the down cushion. You da bomb!
Oooh Bestsy you sound exactly like what I thought you'd sound like! What fun to see the process on the short video. Now I've gotta make one of those suckers...ummmm bag stuffers...ummm..bazookas! I could do this with an old Electrolux vacuum cleaner we have that both sucks and blows...hahhahhha! (Using on the suck option of course!)
OK...seriously this chair's going to be PERFECT!
I love the video and your voice-over! Plus, this has been a fantastic tutorial on upholstery. Now I know I'll never, ever do it. :)
Awesome! I love a down seat cushion and the tips on making the ticking cover is great.
Fun post.... & just an FYI in response to Carol... I worked for an upholsterer & the most expensive cushions would have wrapped springs in a foam core, then a layer of encased down about 2 " thick around the entire cushion. I have those on chairs that I have reupholstered myself & they do not go flat. But have the softness of down... Does that make sense?? : )
I'm trying to figure out how to make a sofa cushion about 5+ feet long, using baffles. Didn't think it through, and have so far sewed the baffle strips to top and bottom, but don't know how to attach the side strip. Any good ideas? It's an old sofa with horsehair, found stripped and raggedy on the street, and I'm trying to restore it to it's former glory.. Thanks for any help.
It seems to be soft and comfortable. This cushion is perfect for home. I think I will make this.Thanks for sharing your idea.
Post a Comment