Saturday, August 31, 2013

Creating Custom Bedding for a Cottage Look

Now that I've finished the chair for Kris's guest room, it's time to work on the beds.
This is where we left off.....

I wanted creamy looking sheets and coverlets to go with the tones of the room.
I also wanted cream sheets for Kris's master bedroom.
The creams of the rooms were two slightly different shades, and being the obsessive color freak that I am, I wanted them to actually go with the tones of each room.
Sooooo.....
we went where we figured we would have a lot of choices.
I hate to admit it, but we went to Bloomingdale's.....
My first job out of design school was as the assistant in the Bloomingdale's design department.
I really learned to hate that job.
Being the mature young woman that I was at the time.....
I used to sit at my desk, 
staring at the cinderblock wall....
and mutter under my breathe.....
"I hate this job, I hate this job..."
really good for the department morale.
I wasn't a favorite.
OY.

Where was I?????
Oh, yeah, sheets.
SOOOOO.....
Kris and I went to Bloomingdale's.
As soon as we walked into the sheet department, a saleswoman came up to help us.
I told her we wanted cream colored sheets and she took us right away to a section that had them.
I was thinking.....
not a bad shopping experience!!!!!
Maybe my memories of this store are outdated!!!!!
And then I looked at the prices!!!!!
She had taken us to the most expensive sheets in the damn store.
I mean.....we only wanted basic cream!!!!!
If we bought the ones she brought us to, we would have spent over $800.00 for a set of twin size sheets.
ARE YOU KIDDING ME?????
I read a few years ago in Consumer Reports Magazine that anything over 200 thread count was unnecessary.
I don't know if that's true, but I am perfectly happy with a 200 thread count sheet.
Sooooooo.....
we let the sales lady know that we wanted something much more reasonably priced, and she left us to our own devices.
jeesh.....
great service.
We were able to find the sheets we wanted and for the twin beds we found matelasse  coverlets and shams from Ralph Lauren.
But we were't able to find duvet covers we liked for the guest room or coverlets and shams for the master bedroom.
We went to Pottery Barn, Bed Bath and Beyond, and looked on the internet.
No luck.
So we then went to Calico Corners for fabric, and I'm making the rest myself.
For the guest room we chose a beautiful green fabric that also has a matelasse look.
Kris was worried it was going to be too much matelasse, but when it's all done, I think it will be fine and dandy.
I also want a patterned pillow to lean against the bed pillows for a little pop of color. 
In the picture below I used one Kris had to show what I mean.
I know it doesn't go, but it was good for figuring what we needed.
Here's a closeup of the matelasse coverlet.
I got to hand it to Ralphy baby,
 it's a really pretty pattern.
I like to wash new matelasse in hot water and then dry it on regular.
This way it shrinks a little and the quilting details puff up more.
I need to get Kris to wash these new ones, and I'll show you how it really adds more depth of pattern.
The green fabric will be made into duvet covers.
I plan on going to Joanne's and finding some pretty buttons for the closures.
We still have to figure out what we want for the patterned pillows.....
So much decorating.....
So little time.....
When the dust ruffles are made and installed, we will have even more pattern on each bed.
They are going to be the same fabric as the draperies.

Kris just got the new boxspring for the second twin bed.
If you have two different beds and are making a mismatched pair, like we did, 
it's important that the two beds end up having mattresses that are the same height off the floor.
The way to do this is to have the boxsprings made with different thicknesses.
This way the top of the boxspring is the same for both beds, so the dust ruffles will look the same.
We had custom mattresses made.
Surprisingly enough, custom mattresses and boxsprings aren't any more expensive than standard sizes.
So now that the boxsprings are here, we can have the dust ruffles made!!!!!

If you want to know what the green fabric is.....
I took a picture of it's tag.

For Kris's Master bedroom we found some more Ralph Lauren fabric that worked with her color scheme.
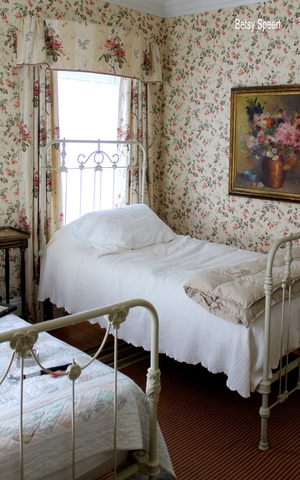
Here's a shot of her bedroom when we last saw it.....
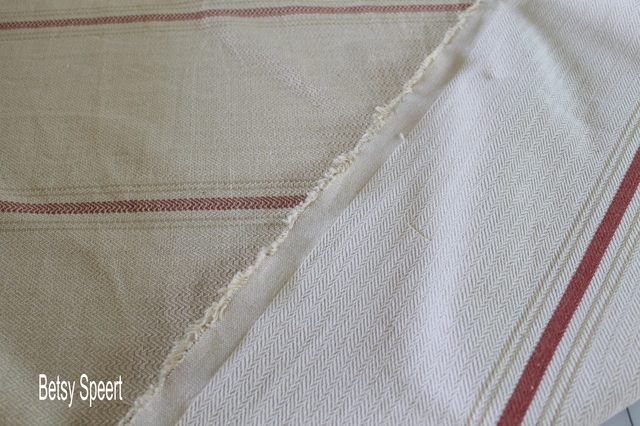
We (Kris) found a fabric that we liked.
The large stripe fabric actually looked better on the wrong side.
I am making a coverlet out of it, and plan on folding it back so the other side also shows.
Unfortunately, the wrong side has the knotted threads showing, so I don't know if Kris will like that.
She gets back from vacation today, so we'll see.
In my next post I'll show the painful process of making the coverlet so it looks good with finished seams on both sides.
The pillow shams are going to be made out of the smaller stripe.
We still need to find something for the duvet cover.....
OY.

On that note,
Latah, Gatah
Photobucket

Thursday, August 29, 2013

How To Sew Double Welting

Brought to you by popular demand!!!!!
Here is my tutorial on how to sew double welting.
There are ways to sew it by just sewing one seam, but I can't get it nice and tight that way, so I figured out my own way.
SO HERE IS MY WAY THAT I FIGURED OUT ALL BUY MYSELF!!!!!!

First you gots to cut your strips of fabric and seam them together to the length you'll need.
The strips should be over 2" wide.
I suggest you practice on some welting and figure out how wide you need to comfortably sew the welting.
I do it according to what my fabric is and how much I have to play with.

If it's a normal fabric, you'll want to cut it on the bias (diagonal) so that the fabric can stretch nicely when going around corners.
If it's stretchy, like the linen I used for Kris's chair, you'll want to cut the strips with the weave, parallel or perpendicular to the selvage.
 I use a zipper foot when sewing single welting.
 I position it so the foot is to the right side of the needle, and the needle is in the normal stitching position, not in the center.
This is probably wrong, but it is what works the best for me and my clumsy fingers.
 I fold the fabric over one of the welting cords and stitch as tightly against the cord as I can.
(unless it is a stretchy fabric, and then you can't pull too tightly on it or it will end up gathering and you'll end up crying.......)
 I use my middle finger to hold the cord in place against the zipper foot, and use my index finger to hold the fabric down in front of the needle.
I use my right hand to also hold the fabric against the right side of the cord, but I couldn't take a picture and show you because I needed my right hand to hold the camera......
Once the first cord is sewn into the fabric casing, it should look something like this..... 
Then I pull out my double welting foot.
You can make a double welting without it, just using your regular pressure foot, but the double welting foot really helps make a nice tight double welt.
The one on the right I bought on ebay.
I thought I left it in Florida, so I bought another one from my sewing machine store up here in Massachusetts.
The one of the left is much better than the one on the right.
I didn't realize I had it until I finished making all the #$% welting for Kris's chair.
 Once attached to the machine, I moved the needle to the center position,
 I placed the sewn single welt upside down, and laid the second cord along the first cord.
 Then I flipped it over and pulled the fabric tight against the second cord.
 Then I placed it under the pressure foot, letting the two cords fit into the grooves in the foot with the needle running down the trench in the center.
I pulled the fabric with my middle finger out to the left side of the welting and sewed it down the middle. 
This is how it should look at this point.
You may need to practice this, but it's really not that difficult.
It's just a matter of learning how it should feel when you're pulling the fabric tight against the cord.
 Then flip the welting over and trim the excess on the back.
 You want to trim off enough so that it doesn't show when the welting is right side up.
This is how it should look on the back.....
 It should end up looking like the picture below when you're done.
I used scrap fabric, so ignore the fact that the stripe is all squiggly.
 Here's a close up.
Use thread that matches the fabric.
I didn't bother to change the color for this here tutorial, 'cuz I couldn't be bothered,
 so there......
 I always leave extra cord sticking out of the ends so if the fabric shifts, the cord is still long enough.
I hope this helped all you baby upholsterers out there in blog land.

I am now working on the coverlet for Kris's master bedroom.

I figured it would be easy.
I figured it would just take a couple of hours.
I figured wrong.
You'd think I'd learn, already.....

On that note,
Latah, Gatah 
Photobucket

Tuesday, August 27, 2013

The Chair is Finished!!!!! Or, How to Make a Cushion Cover

Hallelujah!!!!
Hallelujah!!!!!
Hallelujah!!!!!
Hallelujah!!!!!!!!!
I have finally finished the chair for Kris's guest room.
So, here's the before and after...
We left off on Sunday looking at the down cushion I had created with my own little hands....(with Gilles help.....)
As you can see, the cushion form is much larger than when it is covered.
This is necessary to create a comfy resting place for the tush!!
Since the stripe was so large, I was really lucky and had just enough fabric.
I probably should have gotten 7 yards instead of the 6, but I made due.
I laid out my template, centering it on the pink stripe.
Pinned it in place and started to carefully cut it out.
I was sweating bullets because I had no extra fabric.
After I cut the first side out, I laid it over some more (the last) fabric, matched up the stripe and pinned it in place and cut out the second piece.
Then I cut the side boxing strip out of one of the pink stripes, making sure the pattern was centered.
Then I made the single and double welting.....
That took a long time.
The double welting I do in two stages.
If anyone wants a tutorial on making double welting, leave a comment.
The single welt was for the cushion seam, and the double welt was to cover the staples around the frame.
Now it was time to install the zipper.
I googled it, because I knew there was a different way to do upholstery zippers than when I was taught dress making in high school.
First I took two pieces of the pink stripe that were a little longer than the 22" zipper that I was going to use.
I folded them in half to find the middle of the stripe.
Then I ironed them along the fold, and cut 3/4" away from the fold.
If you don't have one of these measuring tools, go get one!!!!!
It makes measuring along seams and cutting out welting fabric so easy, because you can see through it and it has all those measuring marks.
So I laid the 3/4" mark along the fold and used my rotary cutter to cut along the edge.
Then I set the two pieces to make sure the repeat was lined up' 
I pinned one side to the center of the zipper and sewed 3/8" in from the edge of the fold.
Then I pinned the other side and sewed it the same way.
Then I laid the boxing side strip over the zipper and marked where I would cut the zipper piece so it was the same width as the rest of the boxing.
Since the linen fabric was unraveling so much, I sewed a zig-zag stitch around each piece.
I don't have a serger.....one of these days.....the zip-zag worked like a charm and kept it from unraveling any more.
Then I pinned the single welt to the bottom piece, right sides together.
And sewed it on. 
Then I did the top side.
Next, I sewed the zipper section to the back of the cushion cover, making sure it was centered.
First I pinned it in place.
Then sewed it on. Then I got the side strip out and sewed that on also.
Look at the tutorial from Something For The Road, it shows how this is done.
I followed her directions, and it came out perfect!!!!!
This shows how the zipper is hidden inside the pocket, just like on a professionally made cushion!!!!!


Then I pinned the other side on.....
And sewed it in place.
Make sure you leave the zipper open a little.....
or you won't be able to turn the cushion cover right side out.
Then I stuffed the down cushion form into the cover.....
and I think it looks pretty damn good!!!!!
So at this point all I had left to do was apply the double welting over the staples around the frame.
I whipped out my trusty old glue gun
 (that has burned me more times than I can remember.....)
and something called a regulator that looks like a large lethal needle. 
The regulator is such a great tool.
I run the dull end along the middle trench of the double welting, it helps push it into place and straightens the lines.
The sharp end is good for tucking stray threads away and applying little drops of hot glue to hard to reach places.
Everyone should have a least two regulators, because you're always going to be looking for the one you just lost.

So.....
Here she is all finished.
It took a couple of hours to apply the welting, and I only burned myself once.
The regulator also helps with making the double welting turn the corners.


This is all the welting I had left, both double and single.
I only have scraps of the pink stripe left over.
I might make pillows for the twin beds out of it.

I AM SO GLAD THIS CHAIR IS DONE!!!!!
I think I showed a lot of guts to bring you on this adventure.
What if it hadn't turned out OK?????

My next projects will be easier.
I am starting on the bedding for Kris's master bedroom and the guest room.
I will be showing the sheets we bought and what I will make for the coverlets and duvet covers as well as pillow shams.
I am da bomb.....

On that note,
Latah, Gatah
Photobucket
Partying at:
125x125
Related Posts Plugin for WordPress, Blogger...