
I left off my last post teasing you guys with a cliff hanger.....
I showed you this chest.....

When Kris and I stumbled upon this at the auction house, it looked like this.

It had a mirror attached to the top.
I felt that the mirror made it look like a 1940's piece of furniture, which is probably what it is.
I wanted the mirror off, so I could hang a different one over the chest.
I prefer vertical rectangular mirrors over horizontal ones.
The ceiling in Kris's bedroom is high, so I wanted something that would relate to the room better.
We didn't know how the mirror was attached to the dresser, so Kris had a delivery company move it to my house.
It couldn't fit in either of our cars with the mirror on.
I figured it was screwed from inside the piece, and that we would have to take all the drawers out to get to the screws.
We're old, and don't want to work that hard.
Soooooo.....
When the delivery guys showed up with the mirror separated from the body.....
I asked them how they removed it.....
and they said.....
It was removed before they even got to the place to pick it up!!!!!
It was only...
ATTACHED WITH DOWELS!!!!!
I felt very very stoopid.
I still feel that way.....
We are still learning stuff.
It's painful.
So,
now the top has holes in it.
But I don't want to bother filling them in.

So.
I told Kris that we would just have so much @#$ on the top of the dresser, that the holes won't be noticeable!!!!!
The top was a mess, all scratched up and stained.

Once I got it in my basement,
I filled in the gouges on the top with wood filler.

Lately it seems, every time I get an old piece of furniture, something is missing from it that I didn't notice at the auction house.
In the case of this chest, it was a piece on the side of the lowest drawer....
We (Kris) only paid 100 bucks for this baby, so it was still worth it.....

Side view....

First I painted the whole thing in Chalk Paint Old White.
Then I painted the top and the inset side panels in Chalk Paint Country Grey.

Now, I had to stop, and think about how I wanted to proceed.....
Earlier this summer, I had painted a piece for my niece.
At that time I was twisting my brain into a pretzel trying to figure out what I wanted to do with her linen press.
I saw a piece of painted furniture on TV, froze the picture with my DVR, got my camera, and took a shot of the TV.

I really liked the lattice pattern, and saved this for a future project.
Well, the future has become the present!!!!!
I decided to paint a lattice pattern on the top of Kris's chest.
I didn't ask her.....
it was going to be a surprise.....
oy, what if she didn't like it?????
Well, that would just be too bad for her!!!!!
It's hard to criticize free labor.....
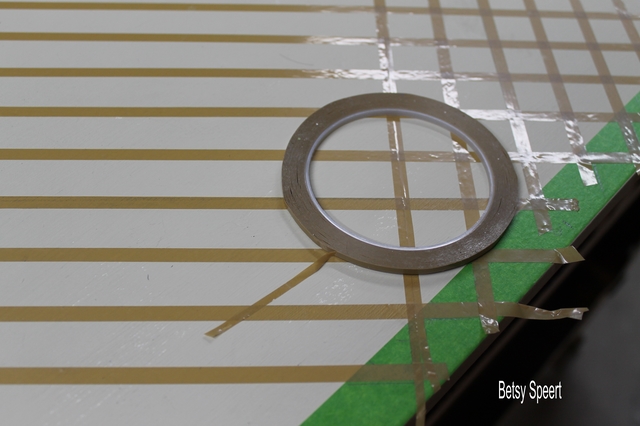
So, next thing I did was get out my striping tape.
I use tape from Finesse Pinstriping.

I used Frog Tape to tape off the edges, and then I started from the center, and used my right angle triangle to create the diagonal lines.

My long straight edge helped lay out the rest, I used its width for the spacing of the lines.

I did one way, and then I started on the other direction.
This was taking forever.....
Then I ran out of tape.....
OY, OY, OY!!!!!
So, I called Finesse Pinstriping and ordered some more 1/4" tape ASAP!!!!!
Paid for extra fast shipping!!!!!
Hurry up already!!!!!
Now I was really bummed, because I wanted to see if what I was doing would work.
I was also worried about leaving the tape on for a couple of days, concerned that it might pull the paint off.
Sooooo.....
I'm sitting in my family room,
ruminating.....
in the room.....
doing very complex math in my head.....
thinking really really really hard......
When I realized.....
1/8 + 1/8= 1/4!!!!!!!!!
I HAD 1/8" TAPE!!!!!
Soooooo....
I trundle back down to my basement workroom,
and whip out the 1/8" striping tape!
Then I had to do
twice as much work!!!!!
So, now it took twice as long as a very long time.

But I done did it.

You have to look at two pictures, because it took me so long, and I took a lot of pictures of the taped top!
Then I dry brushed Old White over the top.

Here's a close up.

And then I pulled the tape off!!!!!
That part was FUN!


Then I taped off the frame on the sides, and gave it another coat of Old White.


Next up was the distressing.
I used 220 grit sandpaper, and gently worked it down through the layers for a more realistic worn look.
I am starting to finally get the hang of distressing.


I think this looks like a really really old piece!!!!!

Next, it was time to do the front.

I painted the frames of the drawers in Old White, and the panels in Country Grey.

Now it was time to repair the drawer.

Kris went trolling on the internet, and found some wood that we cut to fit.

I measured the piece we needed, and then we took it over to my buddies at Drape It,
because they have a saw
and a man to use the saw,
because we be afeared of electrical cutting thingies.

We were too lazy to bring the drawer with us, to make sure the piece fit.
When we got back to my basement woodworking shop, we realized that the piece was a leetle too big.
So.....
I got out my sander.
It wasn't workin' so goodly.....
So.....
I started digging around on my shelves.....
and found a belt sander I forgot we had!!!!!
Kris remembers me buying it.
I don't.
It worked like a charm.
So...
Then I glued and clamped.

That's Kris, waxing the drawers.
That's all I allowed her to do.
This was my project, damn it.....

I showed her how the dresser would work with the patterns form her room.

I put the hardware back on.
We're missing one handle.
I hope to find a replacement on the internet.
If anyone has an idea where to get a drop handle like these, please let me know!!!!!


After the top was waxed it had a slight sheen.

I know I keep showing you the details of the top, but I am really proud of the distressing!!!!

I sanded a little below the handles, as if the paint got worn form use.
But I'm not thrilled with the effect.
I need to figure this part out.

Here she is in the room.

This is the style mirror I would like to find to go over the dresser.


In the mean time, we've rested a couple of botanical prints against the wall to cut into all the pattern.

One more shot of the top!!!!!

Here's a before and after!!!

I didn't put the ormolu garland detail back on the front; we thought it was better without.
BECAUSE OF ALL THE WONDERFUL DETAIL ON THE TOP!!!!

So,
now you know what I do with my time.
On that note.....
Latah, Gatah


.jpg)
.jpg)
.jpg)


17 comments:
Betsy,
Only one word to describe you: AMAZING!
I have loved your style for years and am so glad you have a blog now. Please keep giving us inspiration. YOU ARE AMAZING!
You Know Everything! When someone you know is getting the piece you are working in, how do you finish the inside of the drawers? I dont have the patience to wallpaper them or paint them a great color. Also, what wood filler do you us? Sent from my ipad typed with fat fingers, so i cant correct the typos.
This looks amazing, the lattice top is stunning!!!
So beautiful...I painted wide strips on my guest bedroom walls....'and thought that was hard.... But this with all the angles ... Really tedious... Kris is really lucky to have you as a friend...thank you for sharing... Teresa
I use Elmers wood filler.
As for the inside of the drawers.....
If it's for a friend, and not for sale.....
It's the problem of the recipient to clean them up and line them!
Betsy, I have seen handles similar to this on e-bay under Antiques, Furniture, Parts (or something like that). Maybe you can trade the garland for a handle. Do you know if the lattice on the original dresser is painted? It almost looks three dimensional, as if actual lattice was glued on.
Hi Betsy,
Not sure if this is the exact drawer pull you need or not, but you can check this site out.... http://www.peguerin.com/category.php?category=Drawer_and_Cabinet_Pulls§ion=Furniture_Hardware&sortby=category&viewall=1#
They have a lot of choices, so maybe one will fit. What a beautiful job you did!! mmballard@att.net
Hi Again,
Check out these other two sites also:
http://www.houseofantiquehardware.com/bail-pull
http://www.lookintheattic.com/bailpulls.html
Hope you find the right one!
Cheers, mmballard@att.net
Wonderful job, looks perfect with the walls and fabric, you are so talented!
Another keeper for my Pinterest board! Thank you for all the specificity you provide for your projects. Often times I find the details lacking with other bloggers, but not our Betsy! You are a gem! Best, Beth C.
Wow, that dresser turned out beautiful! You made me laugh at your fear of electrical cutting thingies. If only I could overcome that fear... The things I could do.
That mirror inspiration photo reminds me of the Ikea Songe mirror: http://www.ikea.com/us/en/catalog/products/60178415/. Except that your mirror is short. And gold. And has a band of milgrain trim. Obviously you only do antiques (and I sympathize with that), but I think the Songe deserves special consideration over most Ikea stuff because of its traditional styling and solid-wood construction. (The price isn't too bad, either.)
Just a thought!
Hi Betsy,
I did some searching on line for your Bail Pulls. So far - no joy! Found several that were a close match. Maybe you will have to replace all four and save the 3 pulls for another project.
Do you know the manufacturer of the chest? Of course, you could have someone fabricate a new one - OMG, that would cost more than the $100 you spent for the chest.
Let us, your loyal minions, know the name of the manufacturer of the chest. That will help us help you.
Best wishes, Charlotte
The painted dresser is soo perfect with the bed..love that the trim on it relates so well to the color of the bed. Perfect!
Thank you for this, and many of the other great tutorials.You are better than HOUZZ:-)
dolores
fabululous post. i spelled fabulous wrong i know. so tired. but ihave to say i love this dresser. and you worked your tail off doing it. as a bonus I am going to tell you i have that mirror you are looking for in my malden store. xo
Wow! That took so much effort, but the end results are fabulous! Just stopping by to wish you a Happy 4th of July!
Blessings from Still Woods Farmhouse
Oh my!! What a story! The chest looks wonderful and you must have the patience of Job!!!
You will have to pardon me, but when you look at the chest in the last couple of pictures...it reminds me of smiley faces...side by side : )
running.......................................
Post a Comment