
Well, everyone.....
I'm bushed.
I've been working on my friend Kris's guest room chair for the past couple of weeks,
and I'm now at what I hope is the most difficult part...
because if anything else is harder than the inside back of a curved arm chair,
I don't want to know about it.
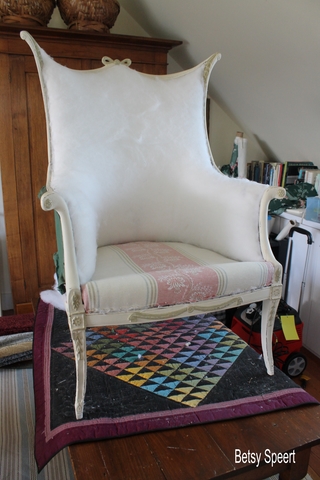
For those of you just tuning in.....
here is a picture of the guestroom I'm doing for Kris.

Here is a shot of the chair when I first started the transformation.

Next is a shot of the chair up to the point of my last blog post.

For those of you thinking of starting a new upholstery project.....
just be warned.....
arm chairs that have a curved back, like the one above, are a bear to reupholster.
You'll see why in coming posts.
You're dealing with two curves.
One is the chair curving around the seat.
The other curve is the way the back rolls over and out.
So the fabric has to be fitted to those two curves.
Oy, Oy, Oy.....
The first chair I ever did, had one....
I thought it would be easier, so it was what I bought at a consignment shop for 20 smackers.
My upholstery teacher laughed at me!!!!!
Here is the shot of the before...
I thought it would be a brilliant idea to remove the channels, and just have a nice smooth buttoned back.
Ha!

Here's the after.....
I did this for my aunt.
It went in her bedroom.

I made the buttons from one of the kits at Joanne's Fabric store.
This is not a good idea for upholstery projects, as they don't hold together well enough for furniture, and the tops will eventually pop off.
So for my current project,
I used a button machine that my buddy's at Drape It have.
(my drapery and upholstery workroom)
I have one in Florida that I keep in my garage upholstery workshop,
but I get to use Drape It's when I am up north in Massachusetts.

Next time I go over there, I'll take pictures of how to make them, for a tutorial.
I forgot to do that this time.
Oops...
The buttons help lay the fabric into the concave curve of the chair back.
One of my readers asked me if that was an old burlap sack used on the back of the chair.
I hadn't even noticed,
sooooo....
good sharp eyes!!!!! 'Cuz it is!!!!!


Soooo....
back to the tutorial.....
for this new chair of Kris's.....
The first step for the back, is to cut out 2" thick soft foam that is shaped like the back.

Sooooo.....
I made a template using tracing paper that I taped together to be big enough.....

See....
it wasn't wide enough.
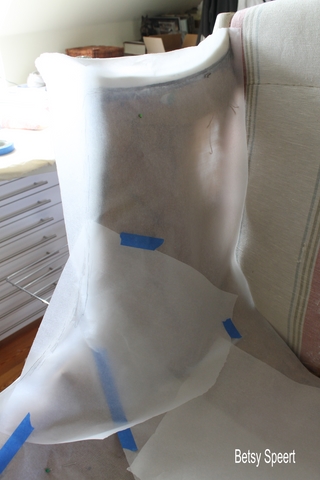
Then I used a pencil to trace the outline of the frame.
You can feel the frame through the paper and use it as a guide.

I then cut out the shape to create my template.
Laid it on the foam and drew the outline in a marker.

Then I got out my electric knife professional foam cutter, and cut out the shape.

The piece of foam wasn't big enough to make the whole back, so I had to piece it together and glue it with upholstery spray adhesive.
Then I had to get the glue off my fingers.
OY.
When I cut the foam, I made it a little smaller that the back, around a 1/2" smaller, so that when I was all done upholstering, there would be room for the double welt to lay flat.
Then it was time to attach it to the chair.

I made the bottom of the foam long enough to tuck into the bottom where the seat hits the back.
Now it was time to staple the foam to the frame.
Now it was time to freak out.
Now it was time to call my buddy Gilles at Drape It.
He's their super duper upholsterer, and my go to guy when it comes to not knowing what the hell I'm doing.
See...
I kept on stapling into the foam....
and it wasn't holding....
and I was not happy.
not at all.
One 10 second conversation with Gilles, and I was good to go.
Wouldn't it be great if every problem in life was that easy to fix?????!!!!!
Sometimes I get so close to a problem, I can't see the obvious answer staring me right in the kisser!!!!!
I thought I was supposed to just staple the edge of the foam, kind of curve it over so it would have a rounded edge.
THAT'S NOT HOW YOU DO IT!!!!!
He told me to staple through the whole thickness.....
and.....
USE BIGGER STAPLES!!!!!
I had been using 1/4", and I needed to be using 3/8".

So, I started at the top, and worked my way out.
Stapling through the full thickness of the foam, right at its edge, is enough to create a nice rounded finish.

I was just stapling the very edge of the foam and pulling it down to created a nice curve.

I tucked the foam into the bottom and pulled it out from the back,
creating a nice smooth tight form.

Then it was time to apply the Dacron.
I cut a piece that would be wide enough and long enough to cover the inside,
and still have enough extra material to grip with my dainty little paws.

I started tacking it at the top with 1/4" staples.
I like to use the smallest staple possible, because I make a lot of mistakes, and the smaller staples are easier to remove.
I continued stapling all along the inside back, pulling the Dacron taught as I went.
Start by stapling in the middle of the back and middle of each side,
and then work out to the corners, pulling the Dacron tight as you go.

I was sure to leave the 1/2" space needed between the frame and the stuffing for the double welt.
Then I trimmed the Dacron with my shears.
I cleaned up any excess with a razor blade.

I pulled it out in the back and stapled to the seat rail.
And then I trimmed the excess Dacron.

THEN I REALIZED THAT I MADE A MISTAKE.....
and had to pull all the staples along the bottom out.
This is why I was glad I used 1/4" staples.
I made this same mistake
on the last chair I did!!!!!
I'm so glad I don't learn from my mistakes.
I would have so much extra time on my hands I might get into trouble.
The Dacron is supposed to be stapled to the bottom rail of the back and sides.
like this here, what I show, down below, in this very picture, that I have for you!!!!!
(If you're confused, the chair is on its side.....)
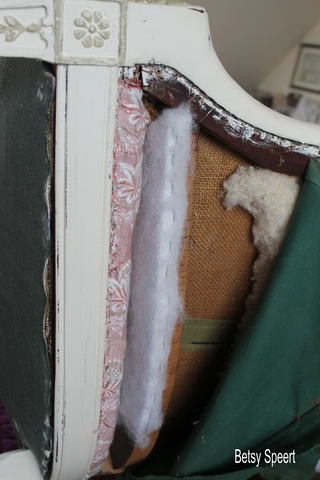
You need to have that space between the top and the seat,
in order to pull the covering fabric down tight.
Sooooo.....
I've gotten it this far.

Here are the stages....
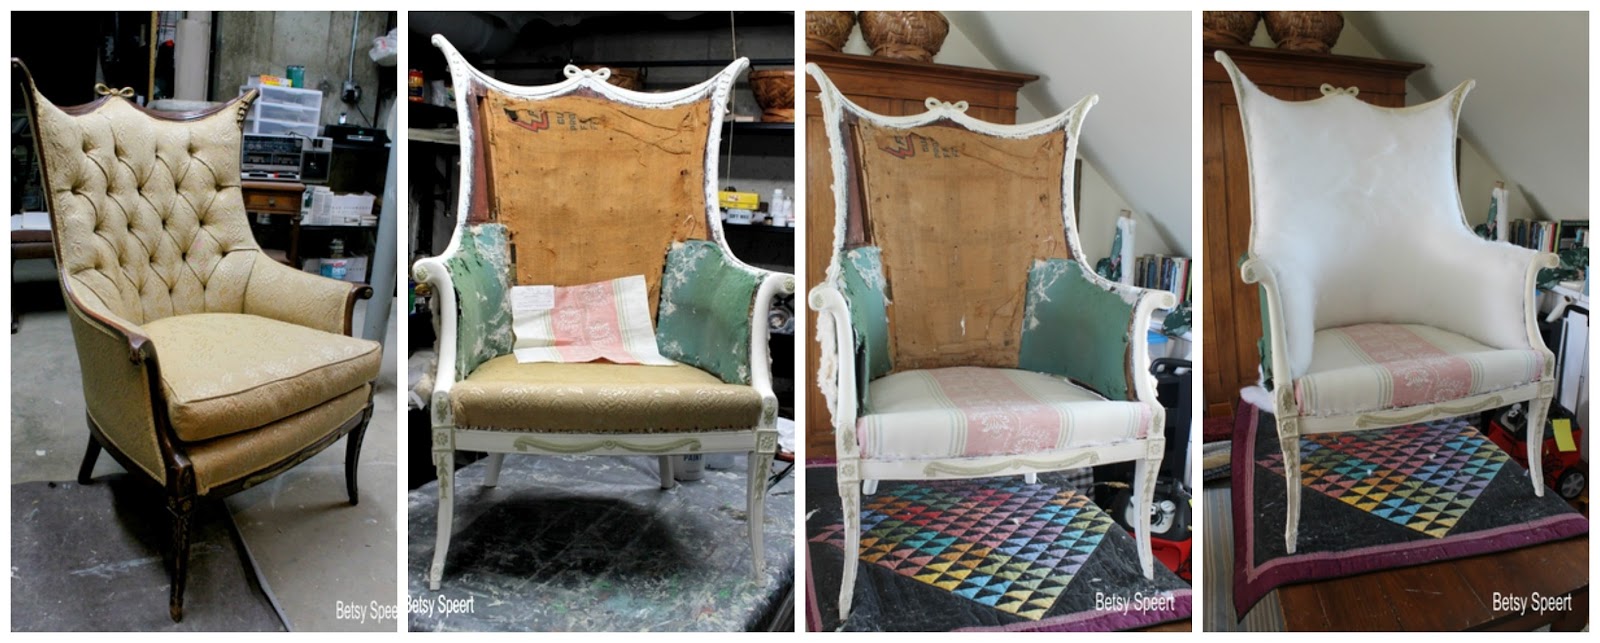
I am now struggling with applying the fabric to the inside back.
I will show and tell all on my next post.
On that note,
Latah, Gatah


.jpg)
.jpg)
.jpg)


15 comments:
You are a real glutton for punishment doing something that complicated! But, it's looking great! Love that blue chair that you did.
Judy
That's it I am definitely going to have a bottle of wine in your honor! Betsy, if you were my neighbor I'd gladly help. Thank you for keeping this lesson real.
Well, now I know why I leave upholstering to the experts...too much to remember! Looking good Betsy! ;)
wow, what a bear! as in bear chair! great tip about the buttons. now i know why my buttons never hold up in my very feeble upholstery attempts. will be interested in seeing that button maker when you get back down here to florida...which is super hot right now, don't come, too hot.
I am in awe! The suspense is killing me! Love the chair you did for your aunt too. Can't believe that was your very first project. Just adorable! Question: I notice you used contrasting welting everywhere except the seat cushion. I always wrestle with where to use contrasting welt. Do you have a rule of thumb? Best, Beth C.
No wonder it costs so much to have something re-upholstered! I wish I had your talent and patience. I know this chair is going to be beautiful. Vikki in VA
This seems way harder than I imagined. I know you will prevail Betsy. Waiting patiently for the next lesson!" Never fear Betsy is here!" LOL
Beth C.
To answer your question about the contrast welting....
For my Aunt's chair, I wanted to outline the overall shape, so I didn't do the cushion.
Each piece furniture speaks to me in different ways.
I look at a piece, and decide how many lines I want going across the front.
I'll be gorgeous when complete. But I'm just tired looking at the long, tedious process. You are an unholstering expert!
Ooops....I meant to write "IT'LL be gorgeous"...or maybe I think I'M a chair! Haha!
Omg, this blog 'tutorial' made me tired and sore just reading it! I know it is going to turn out beautiful. Any particular reason you decided to do it yourself instead of having it done? Just curious. Paula
I'm doing it myself because I like projects!
This chair us definately a challenge, but it's fun to see what I am capable of doing.
I can always throw in the towel.....
But I hope I don't have to.
oy! you are one incredibly talented and courageous DIYer! Thanks for a great REAL tutorial!
Love learning why I probably will never upholster anything...lol. Thank you for showing all thew work so I can in the future understand the cost when I pay someone else!
My only question is - is that an actual little quilt under the chair...??... it seems too pretty to risk being messed up. Wondered why it was being used that way. Thanks!
What do you cover wood that is on the back of a parsons chair so it does not show and you cannot feel it I tried but could feel it PLEASE help!
Post a Comment