
Today I am going to show the class the torture I've been experiencing,
tackling the frou frou chair for Kris.
It's going in her guest room.....

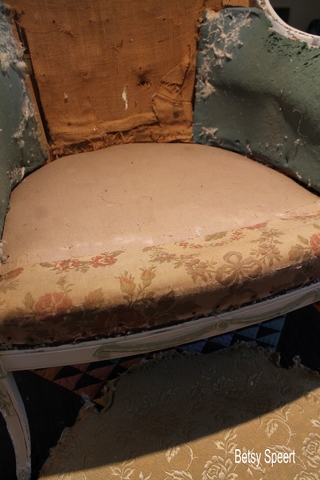
Remember the chair?????

Last I told you guys,
I had gotten this far.....

Sooooo.....
I finished painting the details in green, then I distressed and waxed the chair.

.JPG)
I'm really starting to get a handle on the painted finish I like.
I've only been trying to figure this out for the past two years.
I'm a slow learner.....
anyway......
after I finished painting the chair....
Kris and I dragged it up, out of my basement workshop.....
up to my second floor sewing/upholstery room.

The next thing I needed to tackle was redoing the decking for the support under the seat cushion.
Now,
both my upholstery teachers told me that if the existing decking is in good condition,
the springs in good shape,
DON'T TAKE OFF THE FABRIC!!!!!
LEAVE IT IN PLACE AND JUST GO OVER IT!!!!
So that was what I was intending to do.
First I measured the seat area, to figure out how to cut the new fabric going on the chair.

When making a deck, you need to have a seam going across the front, around 5 inches from the front edge.
Look under the cushion of the nearest chair, you'll see what I mean.
Sooooo.....
I cut the fabric and seamed it together, and then sewed a zig-zag stitch along the cut edge of the seam, because I am using linen, and it's a bear.
It unravels by just looking at the damn stuff.

I then ironed the fabric to smooth the seam.
Don't iron the seam open, though.
You want both edges to lie flat together against the chair.
I then looked at the existing deck again.....
It was really bulky, because the old fabric was thick.

So.....
I thought.....
maybe I'll just pull the front off and see what's under there!!!!!

It was like an archaeological dig....
This chair is from the 1920's, so it makes sense that it had been recovered some time in its past.
Sooooo.....
I took off the top deck cover, and kept the original fabric in place.
I thought it was really funny that the original fabric hadn't been centered properly.

I should learn to be less snarky, because I was off by 1/2 an inch by the time I was done with my debacle.
First, I sewed the new fabric along the old seam, using a curved upholstery needle and upholstery thread.

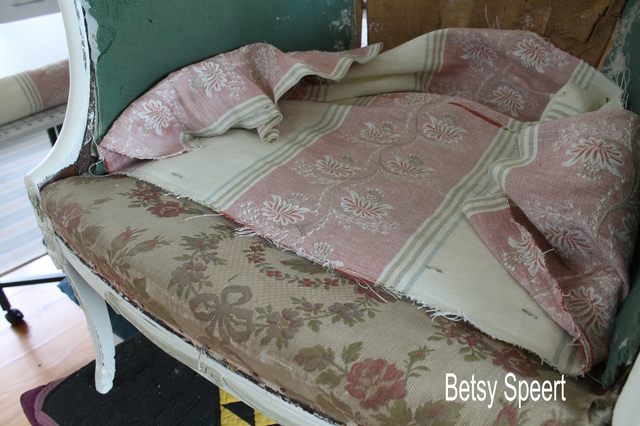
Lay the fabric with the wrong side up along the existing seam of the old deck.
Line up your new seam with the old seam.
Pin in place.
Then get your curvy upholstery needle and sew along the seam.
I was a little brain dead, and started by trying to bring the needle up at the seam.....
NOT REALIZING IT'S MUCH, MUCH EASIER.....
if you sew down through the seam and up through the old fabric.

The first time I sewed the fabric in place, I flipped it over, proud of having gotten this far.....
only to see that the seam had started to come apart, because I did a crappy job of sewing it.

damn
damn
damn
damn
damn!!!!!!
So I had to take it all apart and re-seam it and re-sew it.

Well....
I finally got it right, so it was time to staple it to the chair.
I cut slits in the back corners for the legs and pulled the fabric under the arms and back.

I used my trusty tucker to do this.
I used to use a spatula, but my tucker is much stronger, and much better.

I find one of the hardest parts of reupholstering anything is when I go to cut the fabric around the legs and arms.
This is when the whole thing can go south.

When you do this,
just remember....
you can always cut it a little more.....
BUT YOU CAN'T UNCUT IT!!!!!
This is what makes me so scared.
Weak in the knees.
Sweat buckets.

Anyway, after you fit the fabric around the legs, staple it to the seat frame on the sides and back, pulling the fabric taught and smoothing it across the seat.

Then it's time to do the front.
Flip the front part up, to where the seam is sewn onto the deck.

Then add Dacron padding along the front edge.
Then flip the fabric back down and staple along the bottom edge of the front of the seat.


You can see that when I redid the seam, I wasn't as careful matching up the stripe.
I reassure myself that Kris won't mind, 'cuz it's under the cushion.....
After stapling the fabric, trim it off at the staple line.
Now there is one thing that you should be careful about when stapling your staples.
If you're going to have a double welt trim along the frame of the chair,
leave around a half inch space between the staples and the frame for the welt to fit against the wood.
Otherwise the welt will not be able to lie nice and flat.


The staples should be around 1/2 inch away from the frame.
I probably stapled them too close, but it should be OK.
I hope.
OY.
I trimmed the fabric with a razor blade.
I have a whole pack of them.
They're really good for trimming the fabric, dacron and foam.....
You may feel like using them on your person when in the middle of the project.....
but just keep on going.
I work until I reach the limit of my tolerance for frustration....
and then I walk away and go do something else for a while or a day or a week, until I am able to face the dragons again.
I though the deck would be the hardest part of the chair, but that was before I started on the back.....
I will share the harrowing adventures of that in a future post.
I am in the middle of it.
I hope it goes welllllllll.......
I hope it goes welllllllll.......
OY.
On that note,
Latah, Gatah


.jpg)
.jpg)
.jpg)


23 comments:
Betsy..if EVER I had the crazy thought to upholster a piece of furniture..all I’d have to do is look at these photos and re-read the painstaking labor involved- ad I’d happily call my upholsterer..
But now I know why they charge an arm and a leg..it’s crazy painstaking work!
You are an amazing friend, and obviously, multi talented as well...Can you once show how to upholster the seat of a Louis XV chair? Mine is caned back, no arms, welted. Is that also as difficult?
Dolores
What an amazing friend you are to tackle a project so complicated and you must have the patience of a saint! I'm in awe of your do-it-yourself abilities. Looking forward to seeing the finished product.
Doloras,
That is actually a good first upholstery project!
Are there any classes where you live?
I aleays like to bring something to class that isn't so heavy it will break my back just to move it in and out of my car.
If you look at my upholstery tutorial in my sidebar, you could probably get enough info to figure out how to do your little chair.
Good luck!
Great job as usual. Do you have a pneumatic stapler? When I learned to upholster we used tacks. This seems much faster. Ann
I have a little compressor I got from Home Depot that I attach my staple gun to. You can find used guns on ebay.
You are a brave woman!!!!
Barbie
I've followed you for years in Traditional Home and now you come right into my inbox! This post is great! Years ago after my boyfriend and I broke up, I re-webbed two loveseats. Pounding those tacks into the wood as I stretched the woven web worked off lots of hostility. Unfortunately, I ended up marrying the guy 35 years ago, but that's another story.
Is that an Amish quilt you have under the chair? It could be worth some $$$$$$$$.
You are a goddess!!! I am amazed at all you know how to do, the knowledge you have gathered......you go girl!!! I always wondered how this was done.....it now makes sense using staples....thanks....
Hi Anon Aug. 1 at 7:30 pm,
A Louis chair with a cane back and no arms is simple, simple, simple! A great project for your first attempt. Go for it! Be sure to smooth the fabric so that it is straight with no wrinkles. Take your time going around the places where the fabric goes around the arms. However, welting or gimp will cover a multitude of sins!
The finished chair will look gorgeous!
Smiles from My slice of Provence, Charlotte Des Fleurs
Betsy - I LOVE, LOVE, LOVE that fabric. However, if it is that unstable, how will the seams on the back and cushions hold up under use? Have you considered having the fabric stabilized with a fused backing? That would prevent the seams from falling apart.
Smiles, Charlotte
Betsy this chair, between the paint and the fabric is looking wonderful. I can't wait until you show us the rest!
hmm...NOW I know what my supposed to be double welt trim wasn't/isn't really double. The upholsterer didn't want to re-do the chair that took them FOR-ever to finish in the first place. I swear...now I am really mad. HAHA! See, knowing too much can be dangerous.
I knew upholstery was hard, but good heavens it is SUPER hard! Yeah, I'd be using those razors.
Mary
From Virginia
Lots of people over the past couple of years have asked about the quilt I use on my work table. It's not Amish, my mom made it for me and it's signed by her, with "for Betsy" on it.
I know some if you will be horrified that I'm using it as a protective quilt, but it doesn't go with anything in my house, and this way I get to use it and look at it.
So don't yell at me.....
Betsy - I wish you would publish a how to paint/upholstery book! The photos and instruction are great, but I would love to be able to reach up on the bookshelf and "find you" immediately! Marge
Betsy, #1 I have been lurking on your blog & love everything you show on it. I am hacking most of your ideas one day! #2 Your pictures are worth more than 10,000 words! Thanks for taking the time to post them all. And last #3 I am a quiltmaker....lots & lots of them. You can see my attempts on my blog - but I just want you to know that using a quilt like that , that your mother made for you, is perfectly acceptable in my word! It distresses me to poor blood sweat & tears into something, gift it away and it's parked in some closet somewhere. It makes me smile/happy/giddy when something I have made & gifted is used to the point of fraying. I even make them for my dogs!
Keep up your good work!
Sam
PS - I am a newbie upholsterer & slipcover maker and I have hoarded 9 chairs now...really need to get off my dead butt & get cranking.
Oh I really liked those step by step pictures
I always wanted to know how people covered chairs to make them look so good
That fabric and that chair are going to be beautiful together. Thank you for the tutorial. Now I know if it ever comes to a choice between upholstering a chair and bamboo skewers under the nails, I'm going for the skewers.
Wow! I thought you would take this chair to your upholsterer. You are a brave woman. lol Anyways, the fabric is beautiful, and I appreciate your sharing the process. Paula
Love the chair,love the fabric!
So glad your doing a blow by blow! It's a sound reminder that I should NEVER try this! It's a professional thing.
However I love watching it come to life.
Green is my favorite color I love using it on the trim,really thought you would go with predictable pink for the bows!
I knew I would love this chair! The paint is genius and of course the fabric is amazing. I loved reading every word of your how to recover the deck of a chair. Anxiously awaiting the next installment of the chair fix-er-upper. Vikki in VA.
Uh...looks like a horrendous undertaking....I think I would rather do without than go through all of that. Thank goodness there are talented people like you Betsy that don't mind the torture!!
oh man, I thought this is awesome, I will try to do this myself as I have always wanted to upholster a chair. But now I am not excited at all. It looks painful and painstaking and frustrating until the very end. And I don' think I could take it. You are one heckuva girl taking this project on! I saw that chair you did for our shop and it was outstanding! This is gonna look amazing!
i do the repair my furniture every time if it is damage..i need to read some helpful blogs so that i could get some helpful ideas..
Post a Comment