Saturday, September 28, 2013

Just a Little Construction Can Recreate a Room

Soooooooooooo........
I've been showing you guys my niece and nephew's living room transformation.
We left off with the room looking like this.
I handed the plans of what I wanted to do to Nigel, our intrepid carpenter, and he went to work while I was in Flerida.

Ross and Miriam sent me progress pictures taken with their iPhones.
First the boards went up.....
We left the electrical outlet above the fireplace, as I wanted to have two small lamps sit on the mantle.
I designed the bookcase around the TV and sound bar.....
after all.....
a man DOES live in this house.....
There was a little bookcase by the door to the screened in porch, off the living room.
This is the door they go in and out of a lot,
 particularly when walking Pearla the Wonderdog.....
They needed a place to hang their coats and put their boots and shoes and storage for Pearla's leashes.
Sooooooooooo.....
being the brilliant thinker that I is.....
I had the bookcase reworked into an open closet, since I was adding a larger bookcase on the other side of the room.
I had the upper shelves taken out, and a piece of wood added for hooks.
Then I had a shelf installed across the bottom for the boots and shoes.
Miriam and Ross couldn't even wait for it to be finished......
Since their house only has a small hall coat closet....
this adds a lot of needed storage.
Some folks may not like having to look at this in their living room,
but a house is to live in.
Besides, by the time I'm done with this room.....
there will be so much crap in it that you won't even notice the coats!!!!!

Once the woodwork was installed, it was time for the paint!
Ross sent me more pictures.
I am so glad I didn't have to live through this.
I HATE living through construction.
been there.....done that.....


The blue is a much more cheerful color than that #$% brown.
Next post I'll show you the draperies!!!!!
Maybe..... or other stuff,
I don't know.....
my mind is a mysterious and dangerous place.

On that note,
Latah, Gatah
Photobucket

Thursday, September 26, 2013

Making @#$ into Pearls!!!!!

OK everybody.....
Let's continue with Miriam & Ross's living room transformation!!!!!
As you enter their home, the living room is on the right, and the dining room is on the left.
I wanted the two rooms to relate to each other, so I suggested that they paint the walls a blue to go with the colors of the dining room.
It's hard to tell from this picture, but the blues are the same color.
I like when a house flows from one room to the next.

So, when we started, Miriam and I went out to Calico Corners to look for fabrics.
We brought them back to show her hubby, Ross, and he helped us decide what we wanted and what it should be used on.
Then I chose the paint color for the walls.
The patterned fabric will be toss pillows and cover the chairs at the end of the room on either side of a little table.
This positions the pattern evenly at both ends of the space.
The scrolley fabric behind it I used on the piano bench I upholstered that goes in front of the bookcase.
The fabric below I used for the draperies.
That was Ross's suggestion.
Most of the other furniture will be covered in off white slip covers.

After I did the floor plan, I had to start finding the furniture for their room.
I attacked Craig's List with abandon and glee!!!!!
The first item I found was the end table that would go next to the sectional.
I waved my magic Annie Sloan chalk paint wand over it, and transformed it into a green funky gem.

Then I found the little piano bench for in front of the bookcase.
I painted it, and upholstered it, and then added a slipcover.
I tell ya, Miriam is one lucky girl.
Then I found an old linen press.
It would go down at the end of the room, behind the chairs by the fireplace.
After going to town on it, I made it a personalized piece for them.
Ross wanted to know who R and M were.
(He was kidding)
THEN
I found a small metal table to go between the pair of chairs by the fireplace.
It was black and dirty and pretty disgusting.
Just the way I like my furniture!!!!!
After getting most of the dirt out of the bins.....
I slapped different colors on it.
Miriam wanted some pink, and I try to give the girl what she wants, 
as I figure she will be the one to help me when I am old and decrepit.....

Sooooo.....
that's it for today.
I am a slave for my niece and nephew.
I will show more on the next blog post.

On that note,
Latah, Gatah
Photobucket

Tuesday, September 24, 2013

Creating a Cottage Living Room out of a Dark Pit of Despair!!!!!

Or.....How My Niece and Nephew Get Free Decorating.....

Since Fall is finally here, I thought I would start showing you a new project.
I've been working on Miriam and Ross's living room since early last winter.
If you don't know who Miriam and Ross are.....
they are my niece and her hubby.
Remember what I did in her dining room?????
Let's see the before and after, so you can anticipate the living room transformation.
I still need to make slip covers for the chairs at the end of the table.
I'll do it sometime this fall.....
really!!!!!
Looking at the picture above, makes me tempted to paint the table top.
It's not in the best condition, being a Craig's List find, and a lattice pattern may be just the ticket.......hmmmm.......

Sooooooo.......
here's the before shots of their living room.
As you can see.....
they don't clean up until the room is nicely decorated.
I must admit, I'm the same way.
The white patches on the walls are from new insulation that they had installed all around the house.
This is the wall opposite the fireplace.
This is just behind the leather chair...
This shot is with my wide angle lens.
and here's a shot the other way...
Soooooo.....
they arranged the room the way they saw it arranged by the previous owners.
They placed the sofa between the two doors from the hall and set the TV in the corner.
This way, they could see the fireplace and the TV at the same time.
They're very talented!!!!!
I can only look at one thing at a time.
My eyes both look in the same direction.

Sooooo.....
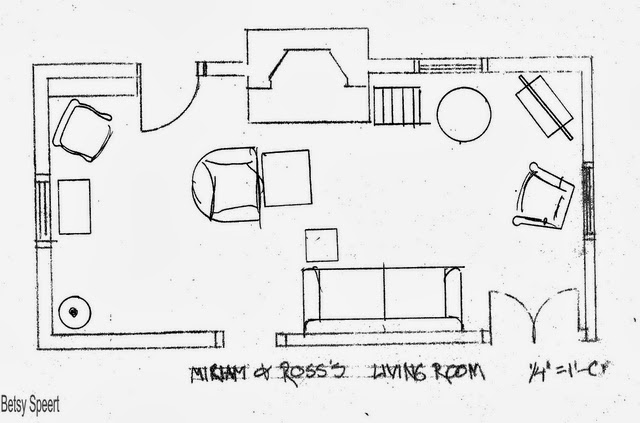
I tried to draw you a floor plan, from looking at the old pictures, to show you how the furniture was arranged before I got my hands on this room.

The problems they faced in this space are really common.
Most people don't know how to handle a long narrow room.
Luckily, being the genius I am.....
I know what to do!!!!!
Arranging the furniture this way accentuates the narrowness of the room, by placing the bulkiest piece along the long wall elongating the space.
Making it look long.
Longer.
Longest.
The room was also painted a drab brown darkish color, which doesn't help in an already dark room.
So,
the first thing to do in a situation like this.....
is what you always should do first!!!!!
Do a floor plan.
Think of a floor plan as the skeleton of the room.
If a body don't got a skeleton.....
then there is nothing to hang the clothes on!!!!!
I wanted to foreshorten the space to make it feel wider and bigger.
To do this, I placed a pair of chairs perpendicular to the fireplace, jutting out into the room.
Having the bulkier piece (sectional) down at one end also worked at cropping into the space, making it feel wider.
I also wanted to choose furniture pieces that were a better scale for the room.
The leather chair was so large that there wasn't room for another chair.
I found a pair of smaller arm chairs on the always helpful and wonderful Craig's List.
One of my clients' (ha!) requirements was wanting to be able to watch TV in a reclining position.
The other client.....wanted a sectional.....
I was a leetle concerned about how to fit a sectional in such a small narrow room.....
But being the pro I is.....
I figured it out, and gave them everything they asked for.....
(except facing the TV and fireplace at the same time.....)
Then I drew elevations of all the walls, so that our fearless carpenter, Nigel, could cottagize it by adding a baton panel detail and a built in bookcase for the TV.
Here's the bookcase.
Soooooo
to give you guys a little teaser of what's to come, let me show you a picture of how far we've gotten.
We still have a ways to go, but it's really coming along, and the youngsters are very happy.
We need to put the white slipcover on the sectional, but they want to wait for the ones I'm making for the chairs........
Oy.
Purla the wonder dog is very happy with the changes.

On that note,
Latah, Gatah
Photobucket

Saturday, September 21, 2013

Finishing Kris's Pillow Sham

Or, How I Finally Finished Sewing The Stuff For Her Bed.....

almost, sorta, jeesh.....

SOOOOOO.....

Today, I am going to show the class how I finished this here pillow sham.
On my last post, I showed you how I did the back closure like a man's shirt.....
So, today,
 I will start with showing the welting I made to go around the outside of this damn thing.
Rather than cutting the welting fabric on the bias (diagonal), I decided to make it out of the stripe part of the fabric shown in the middle of the picture below.
For fabrics that are somewhat stiff, it's really important to cut on the bias, as it allows more stretch and give in the weave of the fabric, so the welt can bend around corners.
But, on stretchier and more pliable fabrics, it's possible to cut it straight with the weave and still have it be able to bend.
I wanted the welting to be a solid looking trim, rather that the angled stripes that a bias cut would have given me.
I made a whole bunch of it......
I used to be afraid of welting.....
now I am the wunderkind of welting!!!!!
I sewed the welting to the pieces of fabric I had cut for the sham fronts.
Then it was time to make the flange ruffle.
A flange is a flat piece of fabric, 
not ruffled,
not pleated.
flat.....
I chose a part of the stripe that I thought would look the best.....
(because, why would I choose one that would look the worst......
jeesh, sometimes I write the stupidest stuff.....)
I seamed the pieces together and ironed the seam open.
Then I folded it in half and ironed it flat.
This would now be my flange.
I pinned it to the sham tops, right side together, with the welting sandwiched in the middle.
Then I sewed it all together.
When I got to each corner, I bunched the flange a little, creating a ruffle detail.
Kris didn't want no girly stuff in her bedroom because she is married to a manly man,
but
I wanted a little softness at the corners,
 so there.
I seamed the flange together where it met.
I had to stop a little away from where it would join, as I had to seam the flange right sides together.
So, I stitched the flange together and finger pressed the seam open, then folded it back into shape and continued stitching it to the face of the sham.
The detail around the corner allows for the fabric to make the turn.
It would have to be either pleated, ruffled or mitered.

So, now it was time to sew the buttons on the back.
I took all these pictures, and didn't even notice that I matched the stripes up wrong on one of the shams.
This was my niece Miriam's fault, as she and her husband came to visit in the middle of sewing this, and I lost my train of thought.
That's my story, and I'm sticking to it.
FYI
Before I sewed the pieces together, I stitched a zig-zag stitch around all the cut pieces so that this could be washed and the fabric wouldn't unravel.
I don't have a serger, so this is the next best thing to do.
So,
here it is!!!!!
All sewed together and ready for it's pillow.
This is the back!!!!!
This is the front!!!!!
This is the side!!!!!
Kris's bedroom is really coming along.
We need to still get a rug.
And a dust ruffle.
And hang the other plate.
And accessories.
And a life.........

But before I go.....
I just want to say.....
Now I know why older folks eat prunes!!!!!
I bought a jar of stewed prunes.
They came in really handy!!!!!
The jar is the prefect size for storing some paint!!!!!!!

On that note,
Latah, Gatah
Photobucket
Related Posts Plugin for WordPress, Blogger...