Tuesday, July 31, 2012

Adding Visual Warmth to a Room

Today, I'm taking a break from showing off my cottage study, to show off 
something else!!!!!

A couple of weeks ago, I painted this table.....

It was a pure coincidence that the blue was the same color as the blue of my dining room wallpaper.
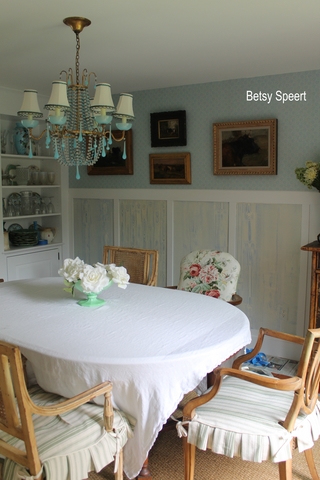
I love the look of board and batten paneling,
 but my dining room has felt cold and sterile to me,
 with so much white on the walls.
(I know, you're probably wondering.....
how can a room with so much @#$ feel sterile????
Well, let's just say that
 I NEED A LOT OF STUFF TO FEEL COZY!!!!!)
So I hauled the table into the dining room, and placed it on its side, so I could see if I would like the recessed panels painted the same way.....
My idea was to paint them in the blue wood graining.......
Yeah, 
that was my idea.....

It doesn't hurt to try it on one panel.....
right?????
So I did...
First, I painted it in Annie Sloan chalk paint, color: Louis Blue
 (yay!!!, I spelled Annie Sloan right this time!!!!)

My sister in law, Faye, was very confused at this point,
 because my family was over for dinner,
 and she couldn't understand how the blue of the panel was going to end up matching the blue of the wallpaper......
Oh, ye of little faith.....
Then I painted a wash of watered down Old White over the blue
 and used my wood graining tool.....
Then I waxed it in regular and dark wax,
stood back,
and hated it.....
It looked like dirty water marked satin.....
The dark wax wasn't doing it, ya know????
So I descended into my dungeon basement,
 and grabbed my mineral spirits, 
and wiped off the wax.....
Well.....
The color was better, but the pattern still didn't look like wood, but satin....
I didn't like this, no, no, no!!!!!
So, I put my thinking cap on.....
analyzed why it looked like@#$.....
I realized, there were too many knot holes and the pattern was too small.
So I googled to see it I could find a bigger wood grainer.
YEP!!!
They make em!!!
In all my brilliance,
 before I grabbed my credit card
 and ordered me some of that there stuff....
I went back down into my dudgeon basement, and looked in my drawer of special paint tools.....
I already had one!!!!!
This is what happens when you buy stuff,and then take 7 years to learn how to use it.....
You can't remember what you gots!!!
I GOTS LOTS OF GOOD STUFF!!!!!
So, I decided to try my hand at a few more panels.....

Step one....
CHECK!!!

Step two
CHECK!!!
I pulled off the tape.....
AND I WAS LOVING THE NEW PANELS!!!!
The color doesn't need the wax, so I am 
NOT WAXING....
ONE LESS STEP!!!!!
YIPPEE!!!!
I have already painted over the first panel I did, it's drying while I type!!!
Here are some close ups of the new panels....


I am going to have to paint some kind of a border around the inside of each panel, because the graining tool didn't make a nice bottom and top edge.
I may go for a tromp l'oiel raised panel effect, I have to think about it.
Knowing the way my mind works, this may take another 7 years.....
Anyway.....
here's the before and after for comparison.
I think the paint really warms up the space visually.....
 Try to ignore the newspaper on the floor with the blue painters tape in a wad....
Just a little more color and pattern, to make the room more homey to me!
So, tomorrow, I will paint the bad panel,
(sounds like a pet; bad panel! drop the cookie!!!)
and do three more.
I figure if I do 4 a day, I can get this done by the weekend!!!!
Then I will take lots of pictures, and make all you guys look at them!!!

Latah, Gatah
Photobucket
partying at:

Saturday, July 28, 2012

Cottage Study Details

So,
I've shown you how I worked my study into a colorful bower of flowers.
Now, lets see some more STUFF....
I found this wonderful Edwardian style linen press from the same ebay vendor that sold me the pair of bergere chairs.
It sits across the room from my desk, and hold my office supplies.....
I've set up a pendeflex frame in the bottom on a pull out linen drawer that works for my hanging files.
It started out holding my clothes, but since all I wear is T shirts and sweat shirts, I needed it more for my office stuff.
I found this pretty 1930's print 
(on ebay, where else?????)
But the frame was a crappy white, so I repainted it in black....
The crocodile skin covered box was my grandmother's, and has her initials monogrammed on the front.....
It's a jewelry box, and reflects the elegance of a bygone day.
The dog is a crummy new reproduction, that I've had for quite some time, so I guess he isn't so new anymore. 
Another few years and he'll be an antique.
It's so annoying to go to an antique store, 
and see
 stuff from my childhood
sold as antiques!!!!!!! 
Oy, Oy, Oy, Oy, Oy.....
(where was I???? Oh yeah, decorating.....)
Next to the box is a Victorian piece of cheap silver plate that holds my
VERY SPECIAL AND EXPENSIVE FAKE JEWELRY PEARLS!!!!!
I like the way they looked draped over the side, spilling casually out of the bowl.....
SO CHIC!!!!! N'est pas?????
The vase is Art Nouveau, 
holding more of my specially grown fake flowers!!!!!
And last but not least is my retro looking fan.....
I tend to get hot when I'm blogging, or just working at my computer.
I don't know why,
maybe all that brain activity generates psychic heat.
BUT I NEED A COOLING MACHINE!!!!!
Just a gentle breeze, to sooth my fevered brow, as I write my pearls of wisdom for you guys.

One last thing before I go out and enjoy my Saturday.
I'm starting to get the hang of the cloning tool on PicMonkey.
Check out this before and after.
I was able to get rid of the cord and outlet!!!!!

Not to brag, but....
I ROCK, BIG TIME, BABY!!!!!

Latah, Gatah
Photobucket
Partying at:

Thursday, July 26, 2012

How to Create a Design with Color and Pattern


Okay doke, campers.......
Today I'm going to do what I said I would do, 
but don't start to think that that is a normal occurrence.

I am going to take you step by step through how I brought color and pattern into what had started out as just a blue and white room.
Here's the finished product.....
No, that's a lie,
I still have to make the cushion and pillow for my desk chair.
Try to ignore them.
Pretend they're done.
OOPS!!!!!
~~~~~~~~~
I had originally planned on mirroring the blue and white toile of my bedroom.
(Once again, here's the reminder shot, so you can see what I'm blathering on about.....)
So, I used the same rug in both rooms.....
I know, I know.....
I already told you this, but some folks are late to the party.....I
I chose a blue and white wallpaper, with an all over pattern that would create a blue background.....
Then I added a white loveseat, continuing the blue and white theme.....
So, at this point, I was developing a room that didn't really reflect my sensibilities.
This is what happens when you try to reinvent yourself into something 
THAT YOU'RE NOT!!!!!
I AM NOT A TWO COLOR WOMAN!!!!!
NO, NO,NO, NO, NO!!!!!
I am a multicolor babe!!!!
Yes in deedy do!!!!!
So this is the progression, from point A (two colors)
to point B ( a gazillion colors).
As I told you, I found the pair of bergeres (French armchairs) on ebay and planned on reupholstering them.....
When I placed the sofa and chairs in the room, it bothered me that the corners of the room were bare looking.
By now you should know that I don't like an empty space, 
it needs to be filled with something!!!!!
I was at an estate sale one weekend, when I came across an old dark beat up and ripped folding screen made from 4 panels out of old leather 
or Naugahyde,
 not sure which, I don't care,
 it doesn't matter, I painted over it.....
I have to show it to you with the screen folded closed, since I forgot to take a picture of it before I painted it, so the front is painted, and I can only show the back to make my point, and the back doesn't hinge the other way, if you understand what I mean, and can deal with this run on sentence.........
So, now I had a blue and white room with big black blobs in the corners.....
oy, oy, oy.....

So, next I painted the screens and decoupaged copies of floral prints onto the panels. 
OOOhhhhh,,,,, I started feeling better!!! 
This is when I realized that I can't deny my
NEED FOR FLOWERS!!!!
I was trying for a more sophisticated look in my new home.
I was trying to be more grown up, now that I was retired.
I was trying to be 
SOMETHING I'M NOT!!!!!
You have to listen to your heart
 when it comes to decorating your own home.
I am a flower girl....
I am a flower woman....
I am a flower babe.....
I am a flower GODDESS!!!!!
Now, I needed to get more on the walls....
the walls looked TOO BARE!!!
So, 
Back TO EBAY!!!!!
I found the pair of plaster sconces and floral 1930's prints, as well as the majolica plates.
I already had the plaster dogs.
(I will be going into more detail about the different elements used in the room in the next few blog posts, so keep tuned. But today, it's all about the transformation from one feel to the next.)
By now, the room was starting to feel more like someplace I would actually live, but I wasn't there yet.
I needed more color.
I needed more flowers.
So, I started working on the toss pillows on the loveseat.
I've mentioned before how important toss pillows are to finishing a space.
Just like an outfit, if you don't have the right jewelry and accessories, a little black dress is just a sad black shmate!!!!
(For those of you who are deficient
 in your Yiddish fluency,
a shmate is a rag.....)
I made a pair of ruffled ones out of left over fabric from a job in Vermont.
Yes, Connie!!!!!
I used fabric from your job!!!!!
And no.....
You don't get any money back!!!!


Where was I?????
Oh, yeah, my blog.
At this point, I stood back and took a long look at what I had wrought.....
STILL.....
NOT ENOUGH COLOR!!!!!
NOT ENOUGH PATTERN!!!!!  
So I added some more of both!!!!
I had been accumulating blue toned barkcloth from ebay.
I threw one scrap over the sofa to see if I liked it for a pillow, 
AND WHAT DO YOU KNOW???!!!
I liked the look of it just draped over the back. 
I've never done that before.
I may never do it again.
Who knew????
I think it's just the perfect touch.
It let me have my white slipcover, but cut into the starkness of the uninterrupted white.
Then I made another toss pillow from another piece of vintage barkcloth, and framed it with leftover trim.
(No Connie, the trim wasn't from your job.)
(JEESH....)
Now it was time to tackle the pair of chairs.
As I told you on Friday, I made the slipcovers in white, but didn't want a totally white look, so covered the cushions in more vintage barkcloth in blue.
But the chairs still looked like they needed more, so I am going to make toss pillows covered in the same fabric as the one draped over the back of the sofa.....
There's not enough to do both pillows front and back, so I need to figure out what to put on the back. Hopefully, by the time I finish writing about this room, I will have made these two pillows, so that I have
EVEN MORE TO SHOW OFF!!!!!
So, here is the before and after, next to each other for comparison 


So, that's how I brought color and pattern to this room.
I hope this was helpful in showing how it's done.
Just one step at a time.
Build on a design.
Take your time and enjoy the process.


Latah Gatah
Photobucket
Partying at:


shabby creek cottageSaturday Nite Special link party via Funky Junk Interiorssunday_button_featIt's Overflowing

its so very cheriDIY project Parade linky party buttonyou are talking too much

mop it up mondays featureBoogieboard CottageUndertheTableandDreaming

MotivatedMondayatBeColorfulBetween Naps On the PorchMakeitPrettyMondayMy Uncommon Slice of SuburbiaA Diamond in the StuffOrganize and Decorate EverythingButtonNo Minimalist HereDIY Tutorial

Related Posts Plugin for WordPress, Blogger...